
Before you get started
This guide is for existing customers who have added a dyed diesel account to their License Express account and want to file a dyed diesel return. These customers may include:
- County, state, and federal agencies
- Municipalities
- Nonprofit organizations
If you previously used Taxpayer Access Point (TAP) to manage your dyed diesel account and complete other transactions, you can learn:
- How to set up a License Express account for your business
- How to set up a License Express account as a service agent
If you have never used TAP to manage your dyed diesel account, you can learn:
- How to register an existing fuel tax customer with an active account
If you’re registered with License Express but don’t have a dyed diesel account, you can learn:
If you’re a service agent acting on behalf of a dyed diesel customer, you can follow the same instructions as the taxpayer.
Gather the required information
To file a dyed diesel return in License Express, you’ll need:
- Tax returns (or other documents) that show all the gallons of dyed diesel your organization purchased and used in exempt vehicles and/or equipment over the past 5 years
- License plate numbers for all vehicles claiming power take-off (PTO) credits
- Optional: Our Washington Power Take-Off (PTO) Schedule, if you want to upload your PTO information instead of letting License Express calculate it
When to file your dyed diesel return
To file your return on time, submit it online or by mail or fax by 5:30 p.m. Pacific Standard Time (PST) on the due date for the current tax return quarter.
The table below shows these due dates. For example, if it’s August, your return is due at 5:30 p.m. on October 25.
Filing quarters and due dates (5:30 p.m.)
| Tax return quarter | File by 5:30 p.m. on this due date |
|---|---|
| First quarter: January, February, March | April 25 |
| Second quarter: April, May, June | July 25 |
| Third quarter: July, August, September | October 25 |
| Fourth quarter: October, November, December | January 25 |
If you submit your return after 5:30 p.m., it may not post to your account until the following day.
If one of these dates is a Sunday or holiday, your return will be due on the next business day.
When to pay taxes
If you owe taxes after filing your dyed diesel return, you can learn how to pay online through this guide, or you may mail a check to:
Department of Licensing
PO Box 9048
Olympia, WA 98507-9048
Like the dyed diesel return, taxes are due by 5:30 p.m. Pacific Standard Time (PST) on the due date for the current tax return quarter. The due dates are also the same as those for your tax returns. For details, see the table with filing quarters and due dates.
If you pay after 5:30 p.m., it may not post to your account until the following day.
There is a penalty fee for late payments. The amount of this fee depends on when you file your return.
The table below shows the late payment fees. For example, if it’s September and you file a return for $100 in taxes on:
- October 31, at 5:30 p.m., then you’ll owe a 10% fee—or $110
- November 1, at 5:30 p.m., then you’ll owe a 10% fee plus 1% interest per month—or $121
Late payments
| If you don't pay by | You'll owe |
|---|---|
| Due date | 10% penalty |
| First day of the next month | 10% penalty and 1% interest per month |
After you finish filing online, you don’t need to mail your return. In fact, doing so may make it take longer to process your return.
File a dyed diesel return
Follow the steps below to file a dyed diesel return for your government agency or nonprofit organization.
At any time, you may choose the “Save Draft” button to save your progress and continue later.
1. Log onto your License Express account. You may need to complete multi-factor authentication (MFA).
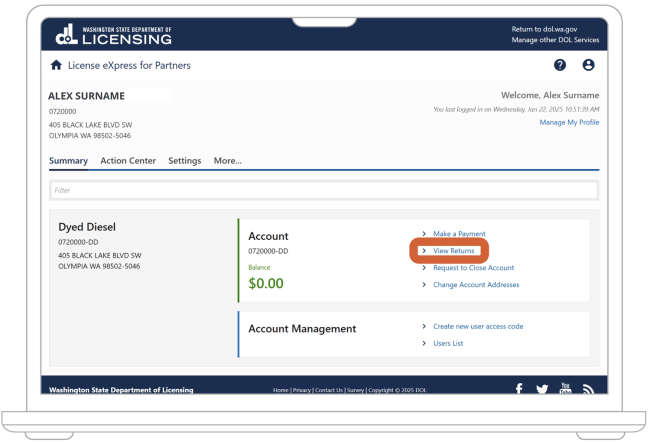
2. On the “Summary” page, find the “Account” heading. Then choose “View Returns.”

3. Under the “Returns” heading, choose “File Now.”
4. On the “File Your Dyed Diesel Return” screen, you can review what you’ll need. After you have submitted your return and we have processed it, you’ll see an “Amend” button on the top right of this screen. You can choose this button to make changes.
5. Choose the “Next” button.
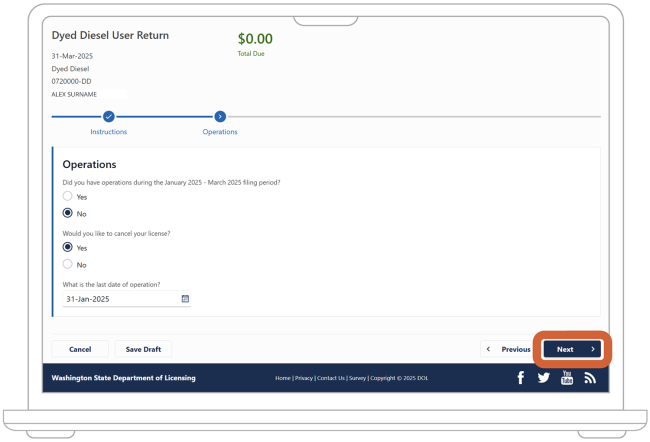
6. Under “Operations,” indicate whether your organization had operations during the filing period:
- Choose the “Yes” option if you had operations.
- Choose the “No” option if you didn’t have operations.
7. At this stage, you can choose to cancel your dyed diesel license. This means the account will no longer be valid after you file your return. All cancellations go into effect on the last day of the month:
- To keep your dyed diesel license, choose the “Next” button. Skip to step 8.
- To cancel your dyed diesel license, choose the “Yes” button.
- In the dropdown menu under “What is the last date of operations?,” enter or select a date. The date should be the last day of the last month you’ll operate.
- Choose the “Next” button.
8. Your next step depends on whether your organization had operations during the filing period:
- If your organization didn't have operations during the filing period, skip to step 9.
- If your organization had operations during the filing period, skip to step 12.
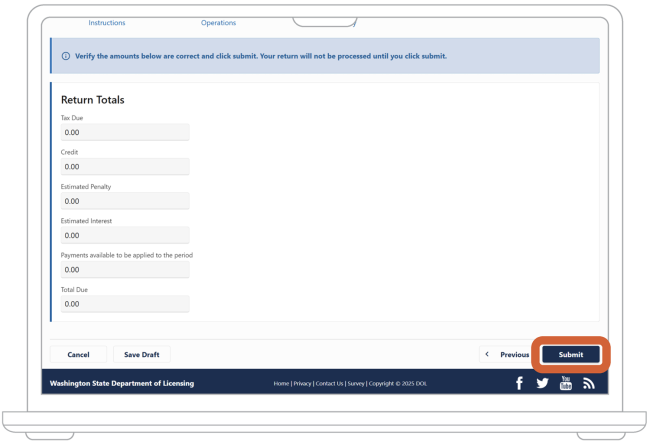
9. Review the taxes you owe or the refund we owe you based on the information you have provided. If you didn’t have operations during the filing period, all the numbers will be 0.
10. Choose the “Submit” button.
11. If you didn’t have operations during the filing period, you’re now finished with this transaction. You can exit this guide and go back to your License Express dashboard.
12. We’ll need the following information for each vehicle and/or piece of equipment you want to report on your return:
License plate number (if applicable)
- PTO type
- Total miles
- Total fuel used (gallons)
- AMPG
- WA taxable miles
- WA taxable gallons
- Credit factor %
- Credit gallons
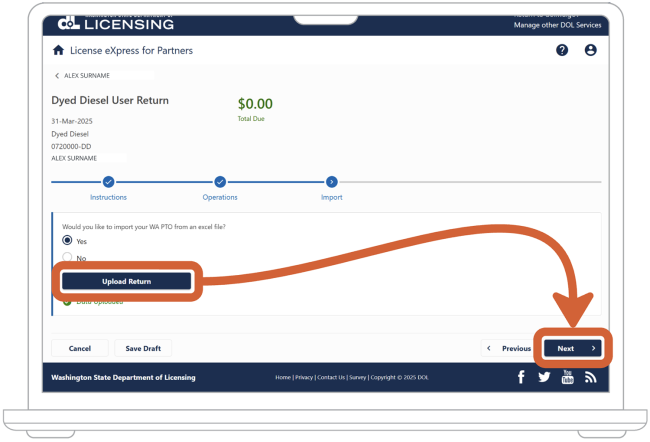
Under “Would you like to import your WA PTO from an excel file?,” indicate whether you want to import information or have License Express calculate it:
- If you want License Express to calculate your information, choose the “No” option and then choose the “Next” button. Skip to step 13.
- To upload your own information, choose the “Yes” option.
- Choose the “Upload Return” button and select your completed dyed diesel power take off template.
After you attach your file, the message “data uploaded” will appear below the “Upload Return” button. - Choose the “Next” button.
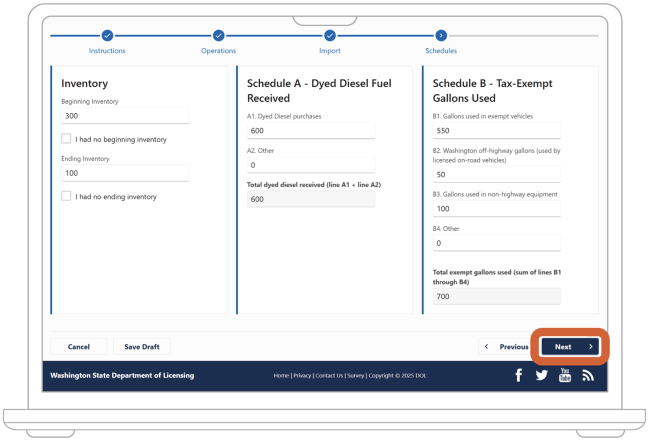
13. Under the “Inventory” heading enter the following:
- Under “Beginning Inventory,” enter the gallons of dyed diesel your organization had in Washington state bulk storage at the start of the filing quarter. This amount must be the same as the ending inventory you reported on your previous dyed diesel return. If your organization had no dyed diesel at the start of the filing quarter, check the box next to “I had no beginning inventory.”
- Under “Ending Inventory,” enter the gallons of dyed diesel your organization had in Washington state bulk storage at the end of the filing quarter. If your organization had no dyed diesel at the end of the filing quarter, check the box next to “I had no ending inventory.”
14. Under the “Schedule A - Dyed Diesel Fuel Received” heading, enter the following:
- Under “A1. Dyed Diesel purchases,” enter the gallons of dyed diesel your organization purchased during the reporting period for this filing quarter.
- Optional: Under “A2. Other,” enter the gallons of dyed diesel you received through other means. Then under “Explain,” tell us where you received it from.
- Under “Total dyed diesel received (line A1 + line A2),” License Express will automatically calculate the total gallons of dyed diesel.
15. Under the “Schedule B - Tax-Exempt Gallons Used” heading, enter the following:
- Under “B1. Gallons used in exempt vehicles,” enter the total number of dyed diesel gallons your organization purchased in Washington state and used in exempt vehicles. Examples of exempt vehicles are:
- Washington state-, county-, or municipality-owned vehicles for street and highway construction and maintenance
- Publicly owned firefighting equipment
- Publicly owned urban passenger transportation vehicles
- Related laws and rules: RCW 82.38, RCW 81.68-70, WAC 308-77
- Under “B2. Washington off-highway gallons (used by licensed on-road vehicles),” enter the off-highway gallons of dyed diesel your organization’s licensed vehicles used in Washington.
- Under “B3. Gallons used in non-highway equipment,” enter the gallons of dyed diesel your organization put into non-highway equipment
- Optional: Under “B4. Other,” enter gallons your organization used for any other tax-exempt purposes. Then under “Explain,” tell us the kind of vehicles/equipment that used these gallons.
- Choose the “Next” button.
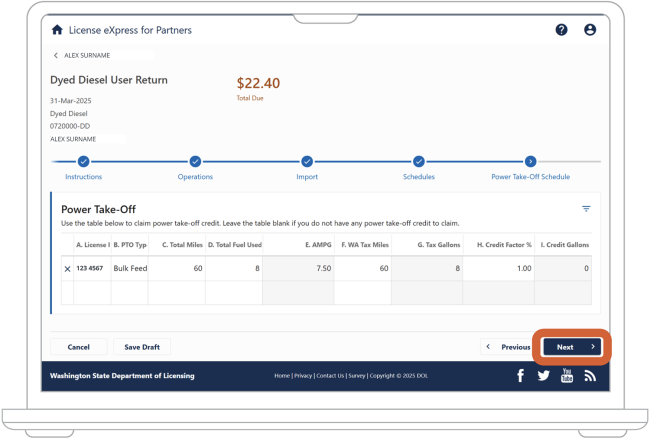
16. Indicate whether your organization is claiming power take-off (PTO) credit. If you're not claiming PTO credit, choose the “Next” button and skip to step 18.
17. If you’re claiming PTO credit, enter the following information for each qualifying vehicle:
Note: If you uploaded a PTO schedule file earlier in this process, License Express will auto-fill this information.
- Enter the vehicle license plate number.
- In the dropdown menu under “PTO Type,” select the vehicle type.
- Enter the total miles the vehicle operated.
- Enter the total fuel the vehicle used.
- License Express will automatically calculate the average miles per gallon (AMPG) for the vehicle based on the information you enter.
- Enter the total miles this vehicle operated on Washington public roads during the filing tax quarter.
- License Express will automatically calculate and fill in the taxable gallons for the vehicle.
- License Express will automatically calculate and fill in the credit factor based on the vehicle PTO Type.
- License Express will automatically calculate the credit gallons.
- Choose the “Next” button.

18. License Express will show numbers you entered and the ones it automatically calculated.
Optional: Check the box next to “Sales tax credit/due (see instructions)” if you want to enter your own sales tax credit. You'll need to upload supplemental sales tax information.
19. Choose the “Next” button.
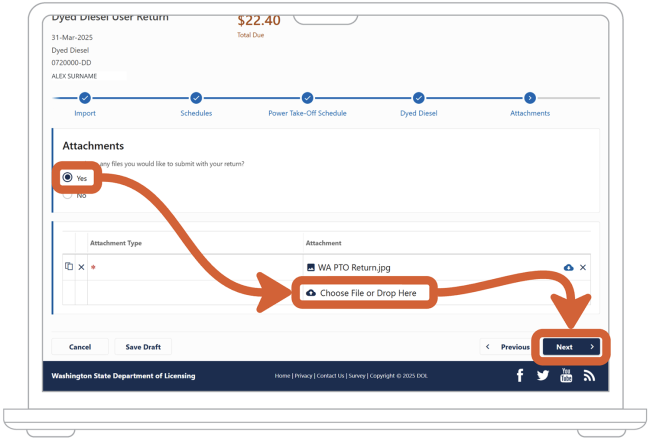
20. Under “Attachments,” indicate whether you want to submit files with your return:
- If you don’t want to upload any files, choose the “No” option and then choose the “Next” button. Skip to step 21.
- If you chose to enter your own sales tax credit or have other files to attach, choose the “Yes” option.
- In the “Attachment” column, choose the “Choose File or Drop Here” button to upload your file. In the “Attachment Type” column, describe what your document is.
- To attach another file, repeat steps 20.2 through 20.3. When you’re finished, choose the “Next” button.
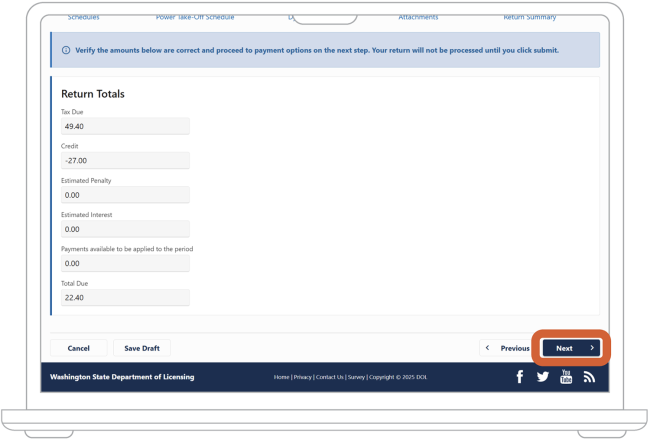
21. Review the information about your return. The "Total Due” is total tax you owe. If you qualify for a tax refund, it will appear under “Refund.”
22. Choose the “Next” button.
23. If you qualify for a tax refund, go to step 24. If you owe taxes, skip to step 25.
24. If we owe you a refund, you can decide whether you want us to mail you a check or deposit the refund into your bank account.
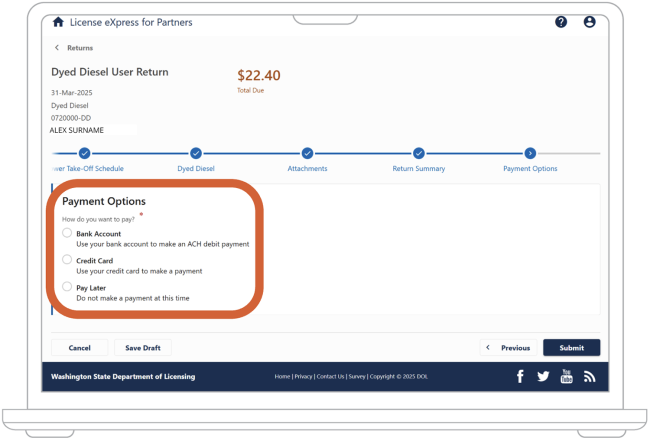
25. Indicate how you want to pay your taxes:
- Choose the "Bank Account” option to pay with your bank account number and routing number.
- Choose the “Credit Card” option to pay using your credit card details. Note: We’ll also charge a 3% fee.
- Choose the “Pay Later” option to submit your return now and pay your taxes later. To make sure you submit and pay on time, check the tables for filing quarters and due dates and late payment fees.
- After choosing an option, choose the “Next” button.
26. Your next step will vary depending on which payment option you chose:
- If you chose to pay by bank account, skip to step 27.
- If you chose to pay by credit card, skip to step 28.
- If you chose to pay later, skip to step 29.
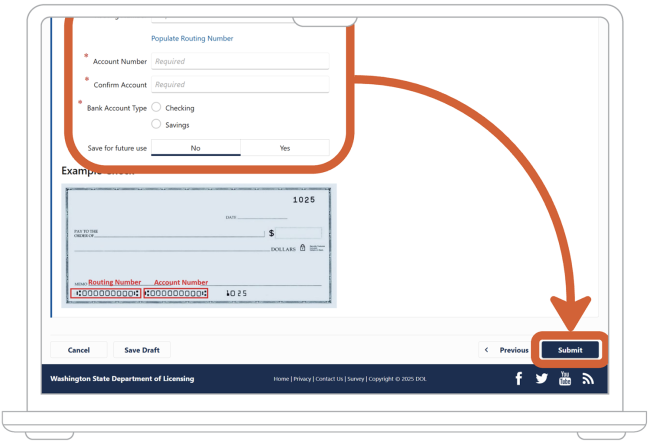
27. Under the “Pay with Bank Account” heading, enter the following information:
- Enter the amount of taxes you want to pay under “Amount” and “Confirm Amount.”
- Enter your bank’s routing number. If you need help finding it, see the image under the “Example Check” heading.
- Enter your bank account number. If you need help finding it, see the image under the “Example Check” heading.
- Confirm your bank account number by reentering it.
- Indicate whether your bank account is a “Checking” or “Savings” account by choosing the appropriate option.
- Next to “Save for future use,” indicate whether you want License Express to save your information for future payments. Choose between the “Yes” and “No” options.
- Toggle the “Certify” option to confirm your bank account information is correct.
- Choose the “Submit” button.
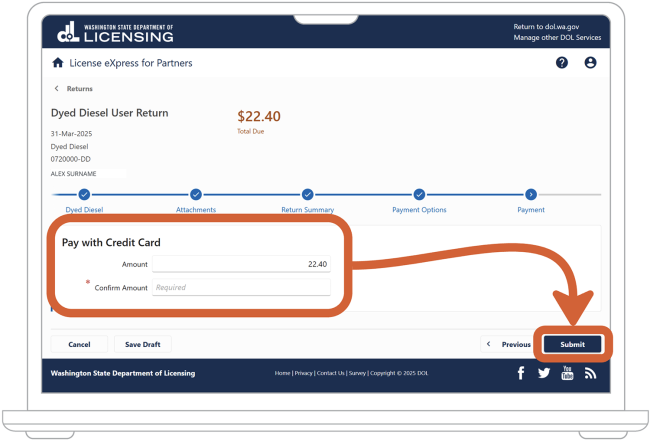
28. Under the “Pay with Credit Card” heading, enter the amount you want to pay. Choose the “Submit” button.
To complete your credit card payment, you can read about how to make a payment.
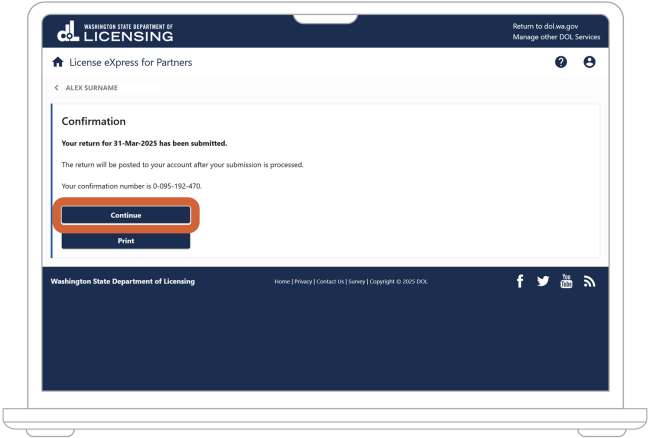
29. On the “Confirmation” screen, you'll see a confirmation number. Keep this number in case you need to contact us for help.
When we finish processing your return, we’ll post the return to your account.
30. You can either choose the “Continue” button to go back to your dashboard or the “Print” button to print your confirmation page.
After you file your dyed diesel return
We’ll verify the information you provided. We may contact you with questions at any time while we work to verify your information. Watch your email inbox or your mailbox, depending on the method of communication you chose.
If we need changes, we’ll tell you why. You can try again once you have the correct information or documents.
We may review and correct your return. This includes making changes to the “Total Due” amount. If we make any changes, we'll notify you by phone, email, or mail. You can view changes to your tax return in License Express.
If your return is overdue and you pay before we process the return, check License Express after we process it to make sure your payment went through.