Before you get started
This guide is for customers who already have an active Fuel Tax or Unlicensed Refund account, but have not yet registered their account for License Express access.
You must set up a License Express account before you can request access to your existing International Fuel Tax Agreement (IFTA), or International Registration Plan (IRP) account.
If you have not already set up a License Express Account, learn how to set up a new License Express account for your business.
If you’re setting up an account for someone else, learn how to set up a new License Express account as a service agent.
Gather the required information
You’ll need the following information about the accounts that you are requesting access to:
- Your Employer Identification Number (EIN) or Social Security Number (SSN) or your Unified Business Identifier (UBI).
- The fuel tax and/or unlicensed refund account number(s) that you want to gain access to.
- For fuel tax accounts, you will need one of the following types of information for the most recent transaction:
- Account information method:
- Payment amount
- Tax due
- Net taxable gallon for the fuel type you select
- Total gallons received for the fuel type you select
- No Operations
- No previous returns
- Access code method:
- Access level that was granted
- Access code generated by the administrator of the account
- Account information method:
- For unlicensed refund accounts:
- Account information method:
- Net refund amount
- No previous returns
- Net Cost
- Total refundable gallons
- Access code method:
- Access level that was granted
- Access code generated by the administrator of the account
- Account information method:
Part 1: Log into your License Express account
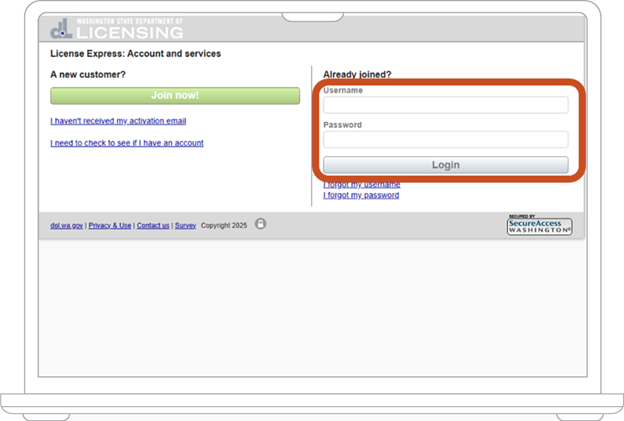
1. Go to the License Express login page and enter your Username and Password and then choose the Login button.
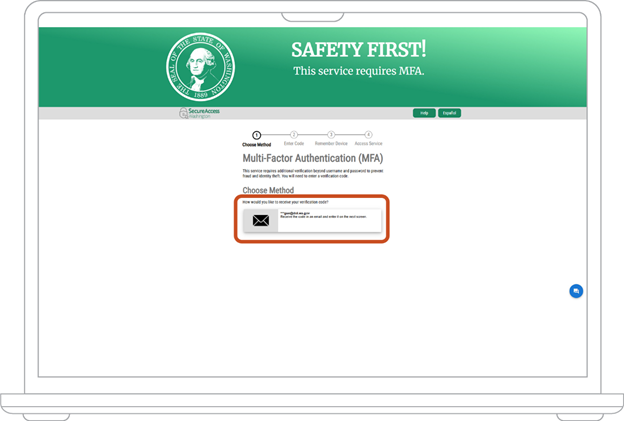
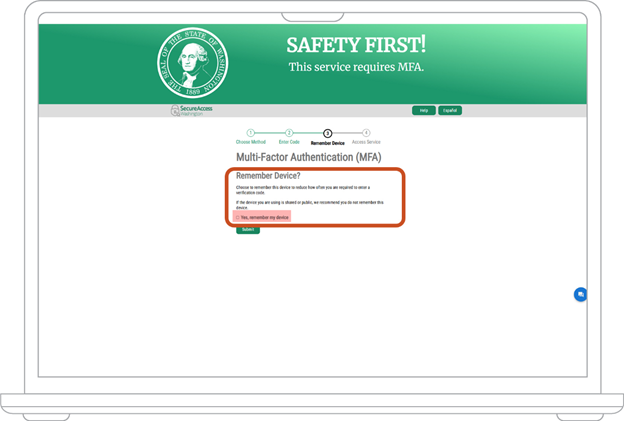
2. After you log in, we’ll automatically redirect you to SecureAccess Washington (SAW) to set up Multi-Factor Authentication (MFA). We require this to help protect your identity and to prevent fraud.
3. Under “Choose Method,” choose your email address. You’ll only be able to see part of the address.
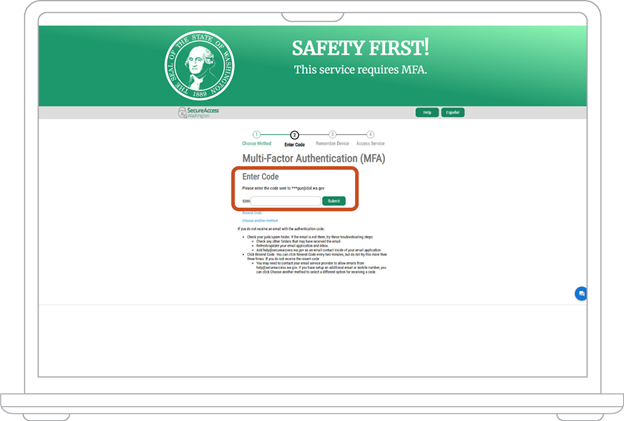
4. You’ll get an email from SAW with a verification code. Enter the last 6 digits in the field after the dash of that code and choose the “Submit” button.
5. Decide if you want SAW to remember the device you’re using. Don’t check the box if you’re using a public computer or one that you share with anyone else. Choose the “Submit” button.
6. At this point, you’ll be logged in to License Express for Partners. If you have a License Express for Individuals account, jump to part 3.
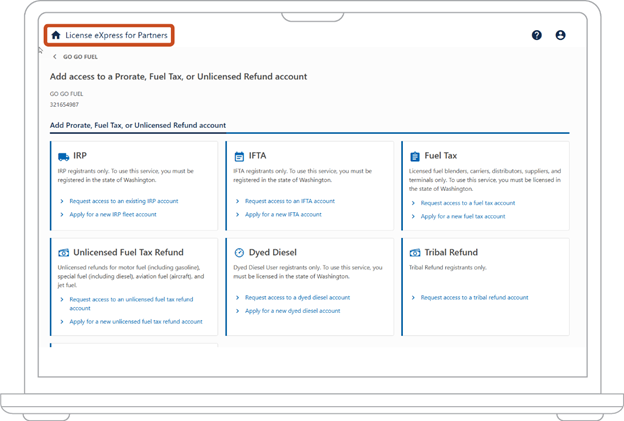
Part 2: Request Access to a Prorate or Fuel Tax Related Account
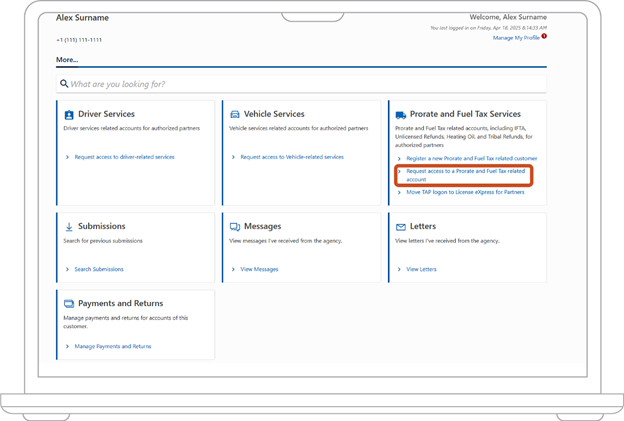
7. From the main dashboard of your License Express account choose “Request access to a Prorate and Fuel Tax related account.
Note: If you have an account already connected to your License Express web logon, select “More,” then select “Request access to a Prorate and Fuel Tax related account.”
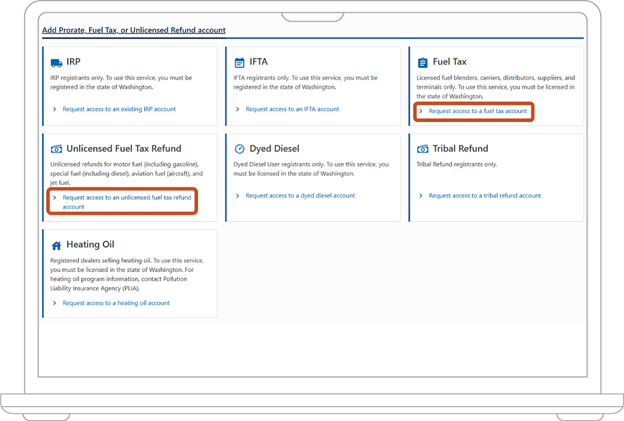
8. The next process depends on what type of account you are requesting access to:
- For Fuel Tax: Under the “Fuel Tax” section, choose the “Request access to a fuel tax account” hyperlink.
- For Unlicensed Refunds: Under the “Unlicensed Fuel Tax Refund” section, choose the “Request access to an unlicensed refund fuel tax refund account” hyperlink.
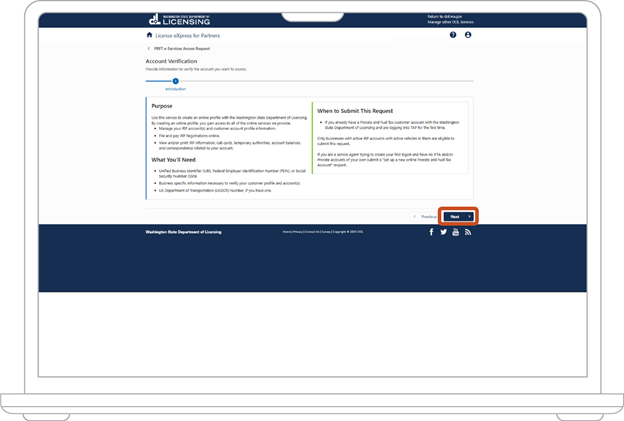
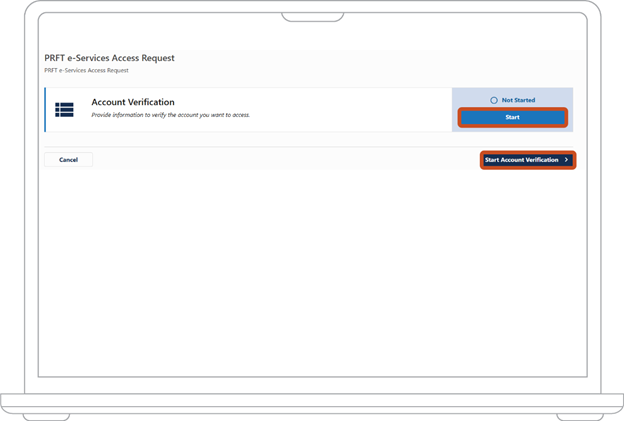
9. On the account verification screen, choose either the “Start Account Verification” button or the “Start” button.
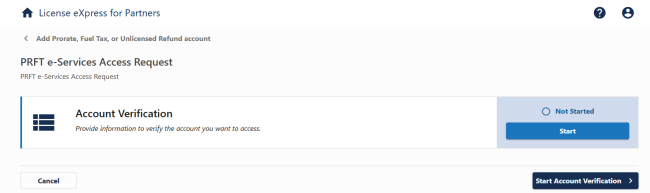
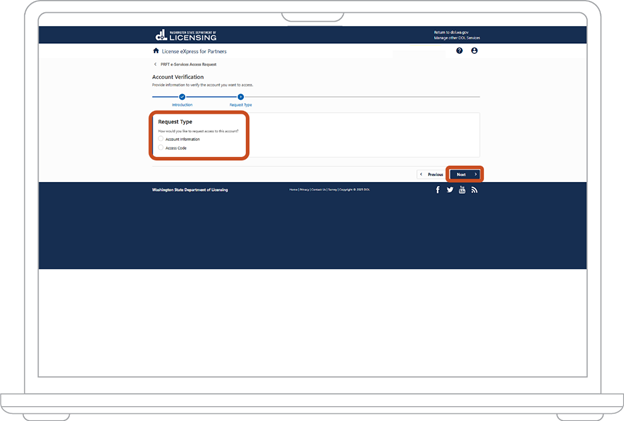
10. The account verification screen will provide an overview of required information. When you finish reviewing the instructions, choose the “Next” button.
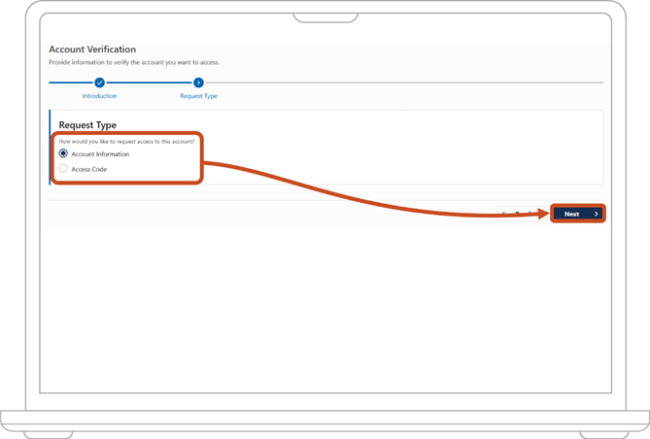
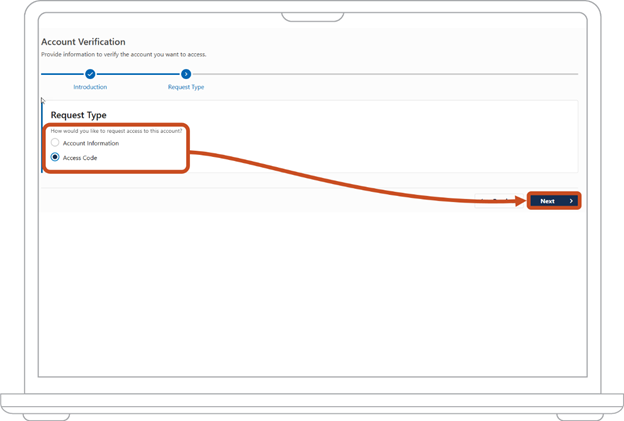
11. You must select a Request Type. There are 2 different options:
- Access Information – Jump to step 12.
- Access Code – Jump to step 24.

Account information method
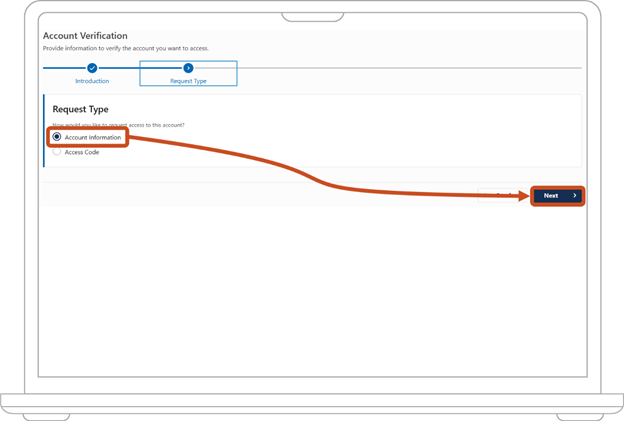
12. Select “Account Information” then choose “Next.”
Requesting a fuel tax account
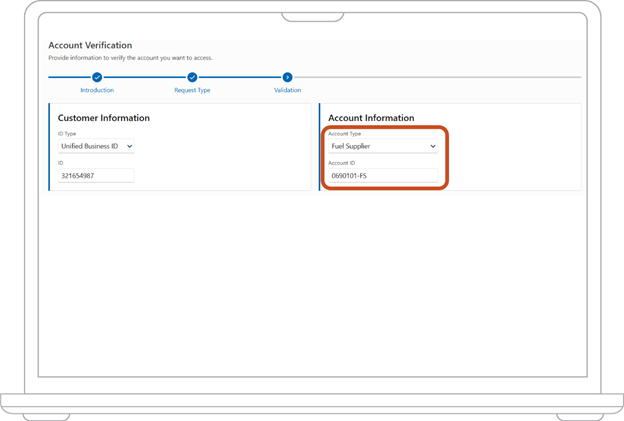
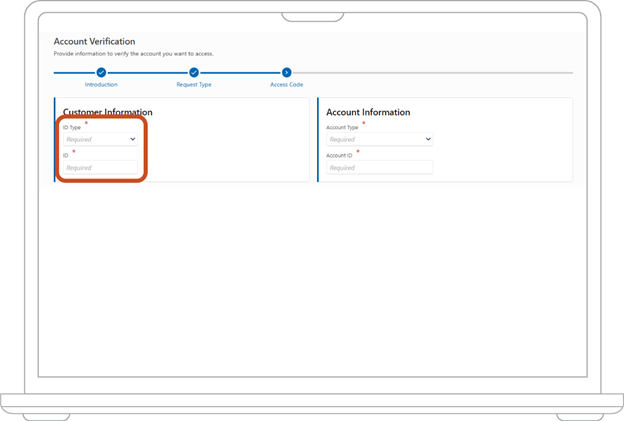
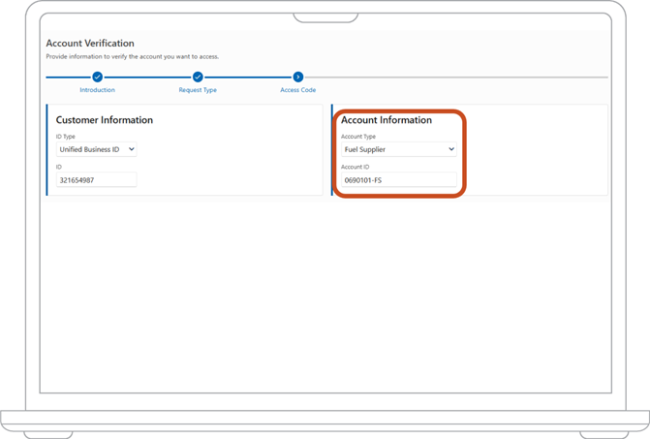
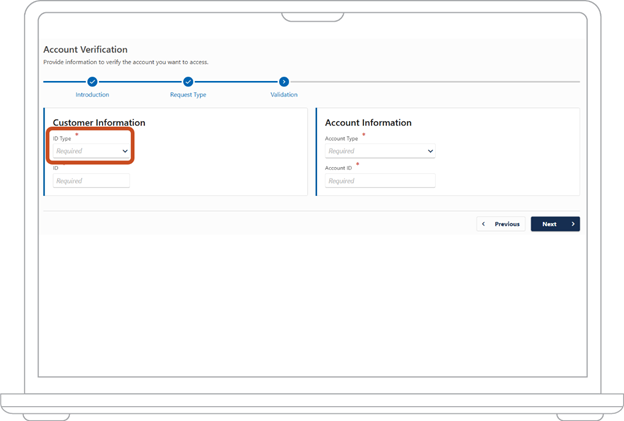
13. From the Validation screen, in the Customer Information section, select an ID type to verify your account with. This can be your Employer ID Number (EIN), your Unified Business ID (UBI), or for Sole Proprietors the Social security Number associated with your account.

14. Under the Account Information section, select the fuel tax “Account Type” from the drop-down menu. Then enter the fuel tax “Account ID” number.
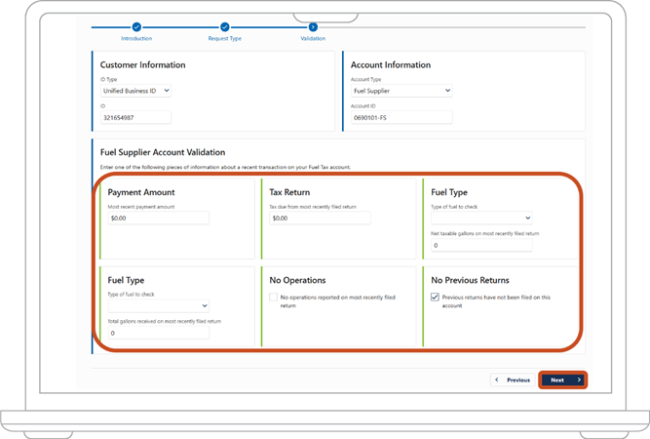
15. Once that is entered, you will need to provide one of the following types of information about the most recent period that was filed:
- Payment Amount
- Tax Return
- Net taxable gallons for the fuel type selected from the drop-down menu
- Total gallons received for the fuel type selected from the drop-down menu
- No Operations
- No Previous Returns
- Choose the “Next” button.
Requesting an unlicensed refund account
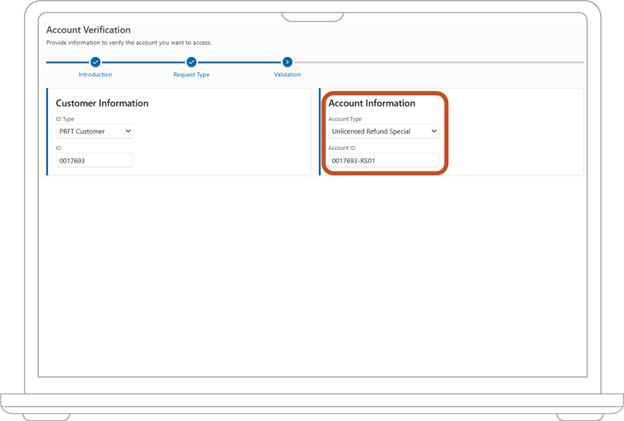
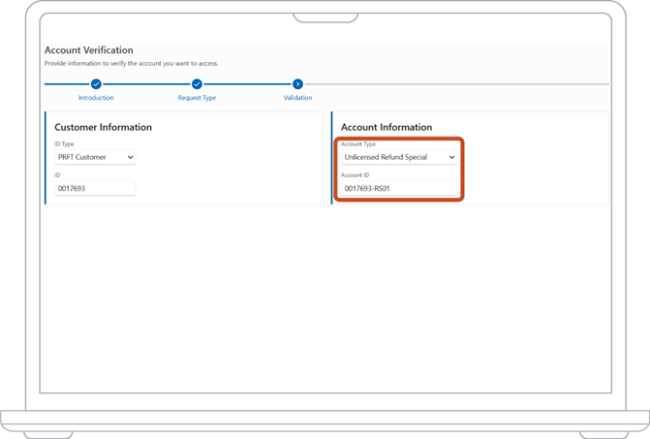
16. From the Validation screen, in the Customer Information section, select an ID type to verify your account with. This can be your Employer ID Number (EIN), PRFT Customer ID, Unified Business ID (UBI), or Social Security Number associated with your account.
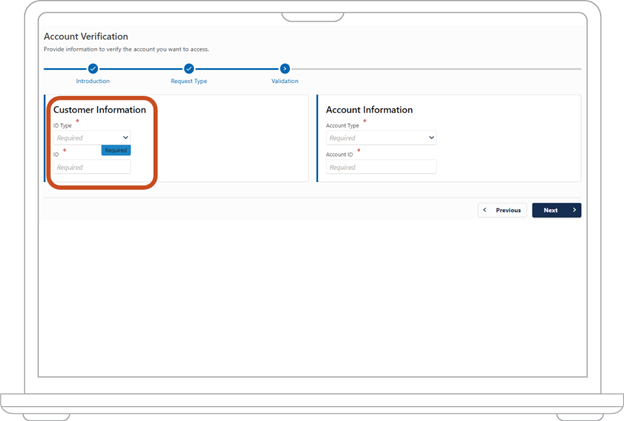
17. Under the Account Information section, select the unlicensed refund “Account Type” from the drop-down menu. Then enter the fuel tax “Account ID” number.
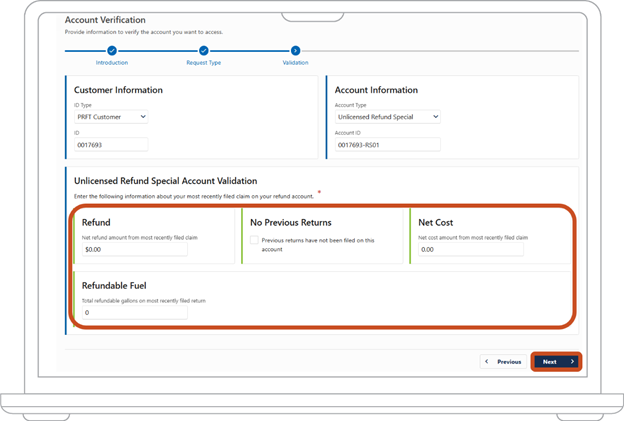
18. Once that is entered, you will need to provide one of the following types of information about the most recent period that was filed:
- Net refund amount
- No Previous Returns
- Net Cost
- Refundable Fuel
Choose the “Next” button.
Continue the account verification process
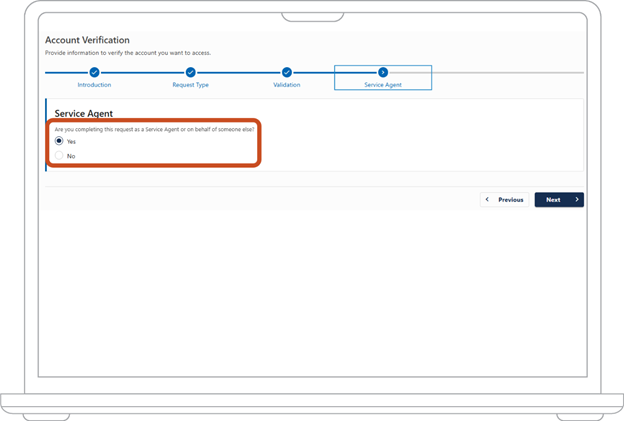
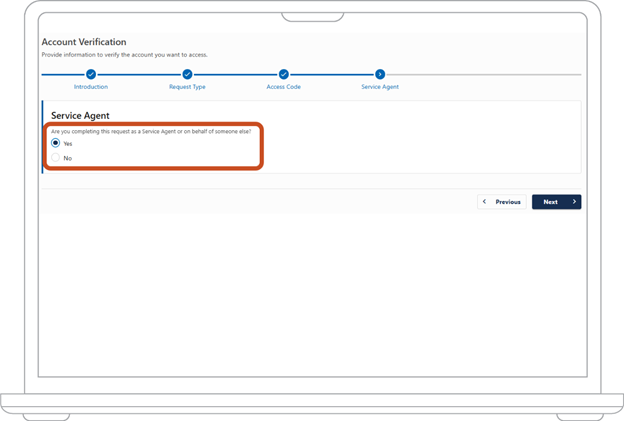
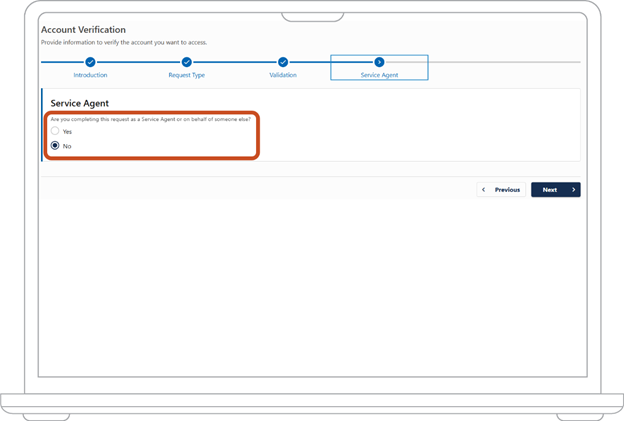
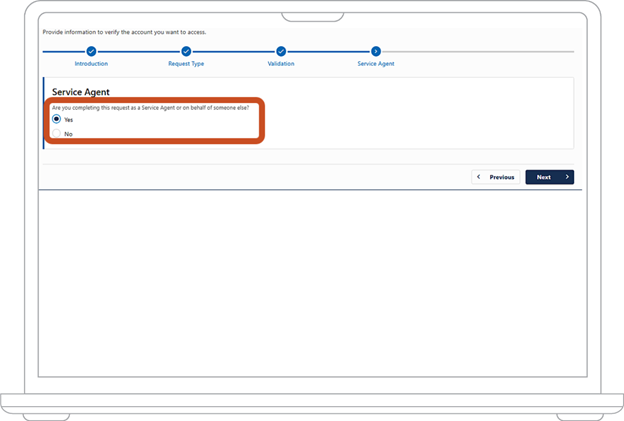
19. Choose whether you want to appoint a service agent:
- If “Yes,” jump to step 20.
- If “No,” jump to step 22.
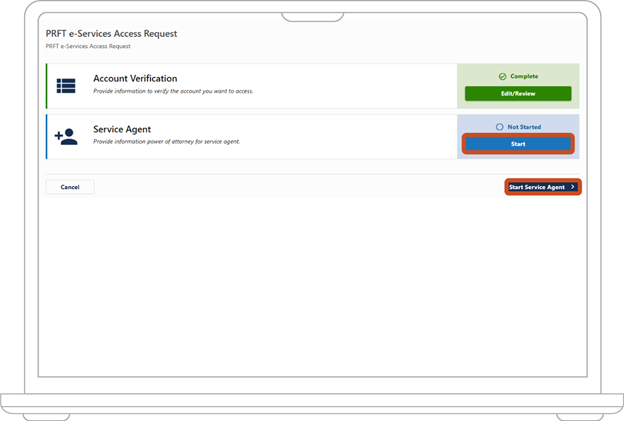
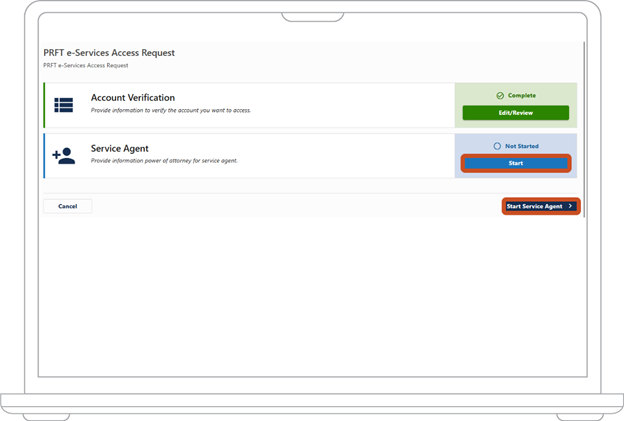
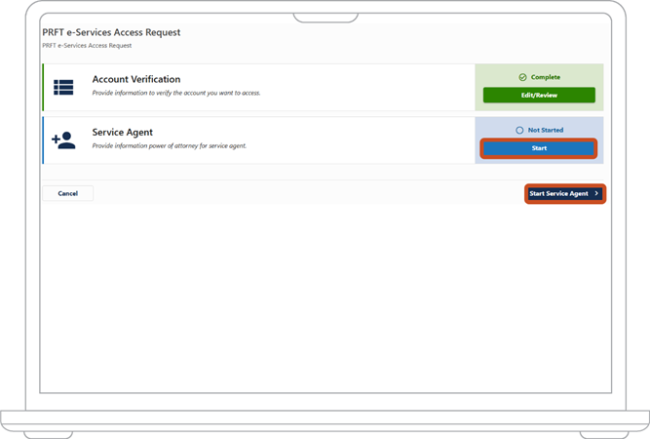
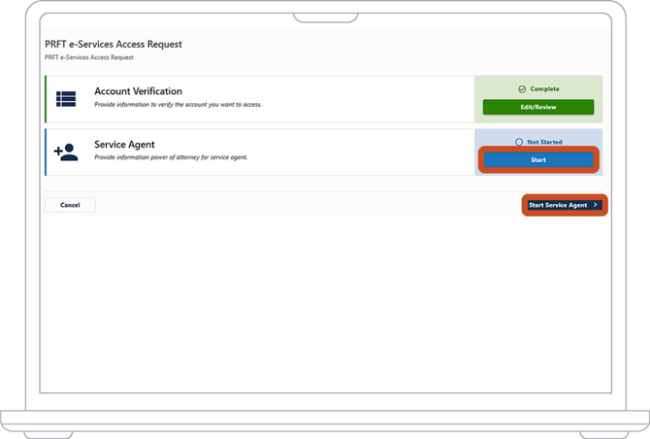
20. On the account verification screen, choose either the “Start Service Agent” button or the “Start” button under the “Service Agent” section.
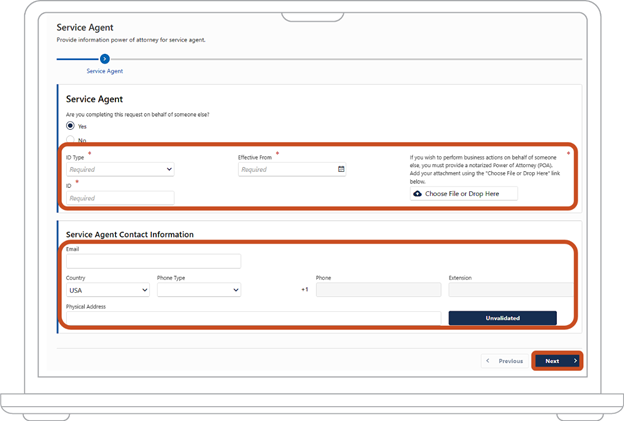
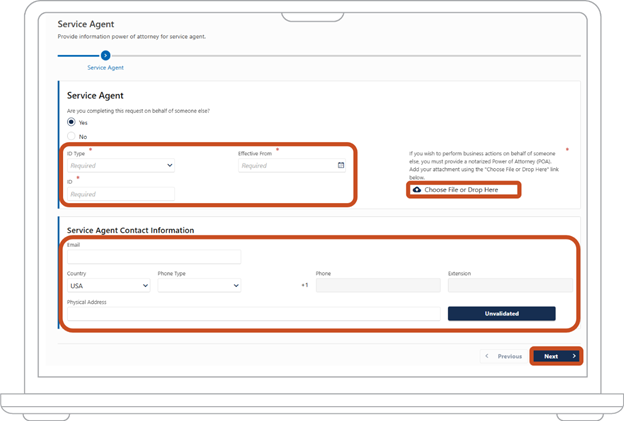
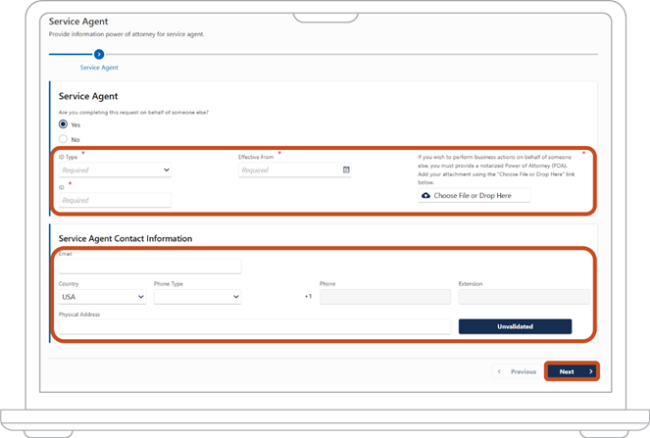
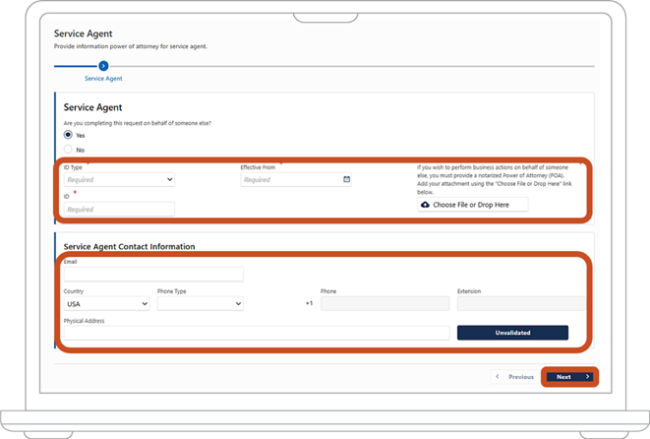
21. Enter the following information:
- In the dropdown menu under “ID Type,” select the type of ID number your service agent uses for their federal taxes. This may be the service agent’s Social Security number (SSN) or an Employer ID Number. The Employer ID number will be the service agent’s federal Employee Identification Number (EIN).
- Under “ID,” enter their EIN or SSN.
- In the dropdown menu under “Effective From,” select the date on which the power of attorney (POA) form was signed and notarized.
- To attach the POA form, choose the cloud icon to upload from the cloud or drag your file to upload it.
- Enter your service agent’s contact email.
- In the dropdown menu under “Country,” select the country for the service agent’s phone number. License Express will automatically select “USA.”
- In the dropdown menu under “Phone Type,” choose your service agent’s phone type from the options.
- Enter your service agent’s phone number and extension number (if applicable).
- Enter your service agent’s physical address. This should be the exact same address that the service agent has under their own account.
- Choose the “Next” button.
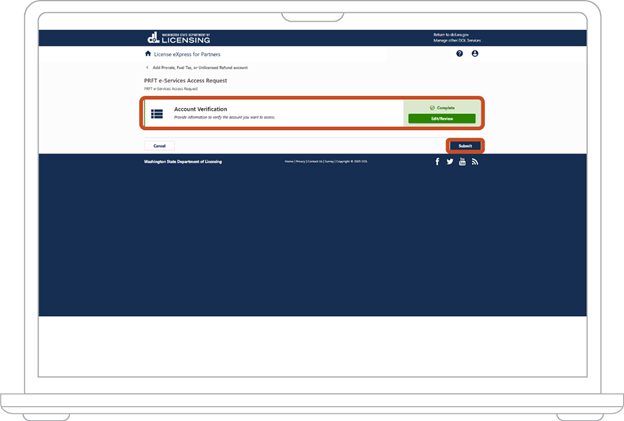
22. Choose Submit to complete the request or Edit/Review if you need to make changes.
Note: Once you select Submit you will not be able to make changes.

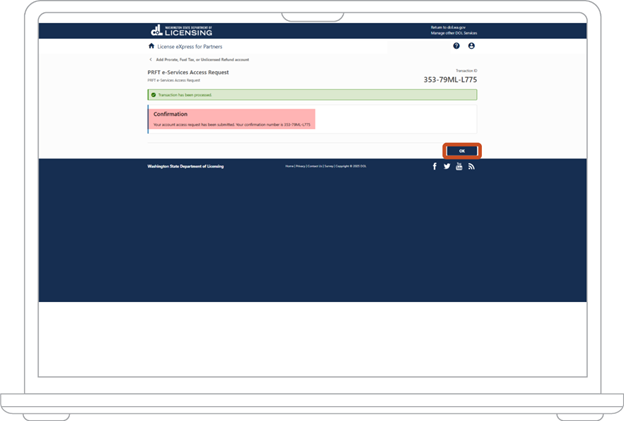
23. After you submit you will be given a confirmation number. Choose the OK button from the bottom right corner to return to the Add Access screen.
Access code method
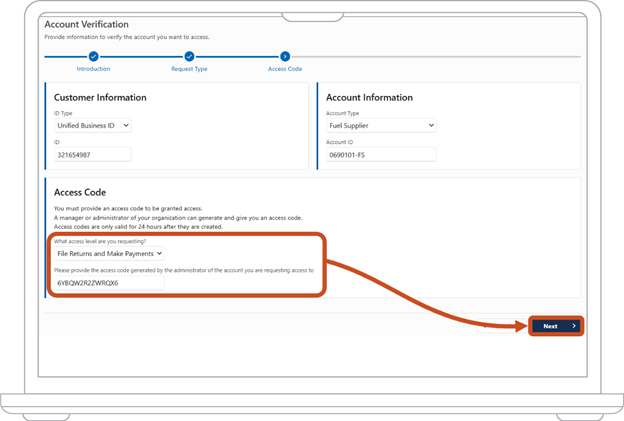
24. Select “Access Code” then choose “Next.”
Note: This process is the same for fuel tax and unlicensed refund accounts.

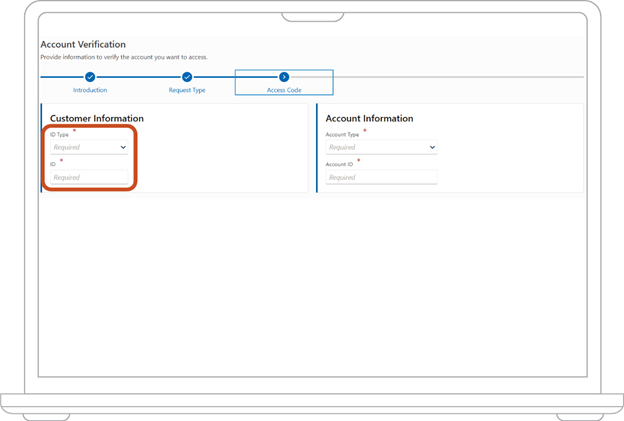
25. From the Validation screen, in the Customer Information section, select an ID type to verify your account with. This can be your Employer ID Number (EIN), PRFT customer ID, Unified Business ID (UBI), or for Sole Proprietors the Social security Number associated with your account.
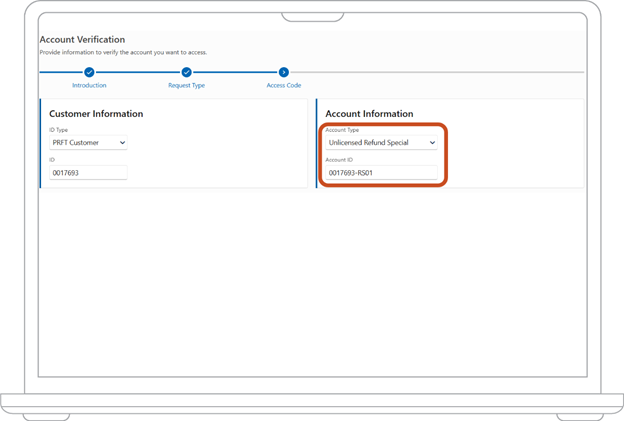
26. Under the Account Information section, select “Account Type” from the drop-down menu. Then enter the “Account ID” number.
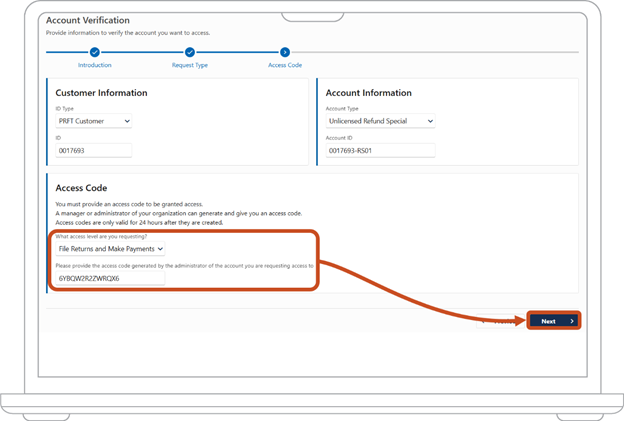
27. Once that is entered, you will need to provide the “Access Code” that was granted by the manager or administrator of the account holder. You will need to enter the following:
- Access level that was granted
- Access code that was generated
- Choose the “Next” button.
Continue the account verification process
28. Choose whether you want to appoint a service agent.
- If “Yes,” jump to step 29.
- If “No,” jump to step 31.
29. On the account verification screen, choose either the “Start Service Agent” button or the “Start” button under the “Service Agent” section.
30. Enter the following information:
- In the dropdown menu under “ID Type,” select the type of ID number your service agent uses for their federal taxes. This may be the service agent’s Social Security number (SSN) or an Employer ID Number. The Employer ID number will be the service agent’s federal Employee Identification Number (EIN).
- Under “ID,” enter their EIN or SSN.
- In the dropdown menu under “Effective From,” select the date on which the power of attorney (POA) form was signed and notarized.
- To attach the POA form, choose the cloud icon to upload from the cloud or drag your file to upload it.
- Enter your service agent’s contact email.
- In the dropdown menu under “Country,” select the country for the service agent’s phone number. License Express will automatically select “USA.”
- In the dropdown menu under “Phone Type,” choose your service agent’s phone type from the options.
- Enter your service agent’s phone number and extension number (if applicable).
- Enter your service agent’s physical address. This should be the exact same address that the service agent has under their own account.
- Choose the “Next” button.
31. Choose Submit to complete the request or Edit/Review if you need to make changes.
Note: Once you select Submit you will not be able to make changes.

32. After you submit you will be given a confirmation number. Choose the OK button from the bottom right corner to return to the Add Access screen.

Part 3: Request Access to a Prorate or Fuel Tax Related Account for Individuals
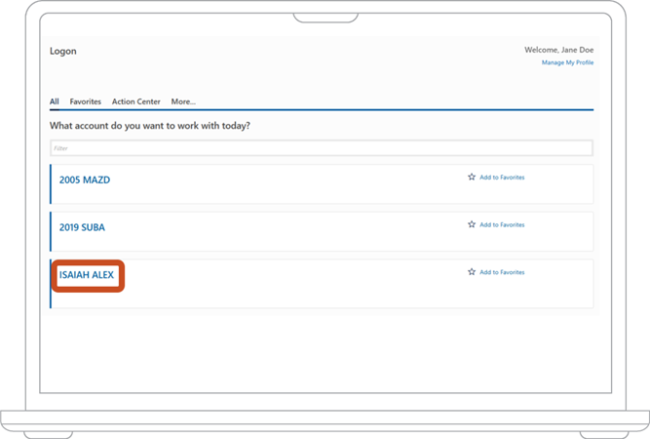
33. From the main dashboard of your License Express account click the hyperlink with your name.
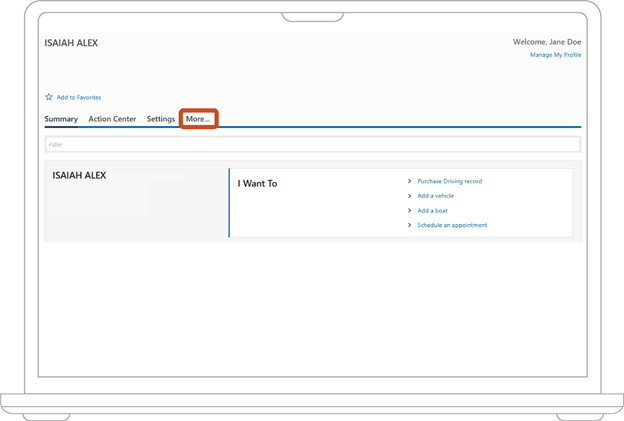
34. Choose the “More” tab.
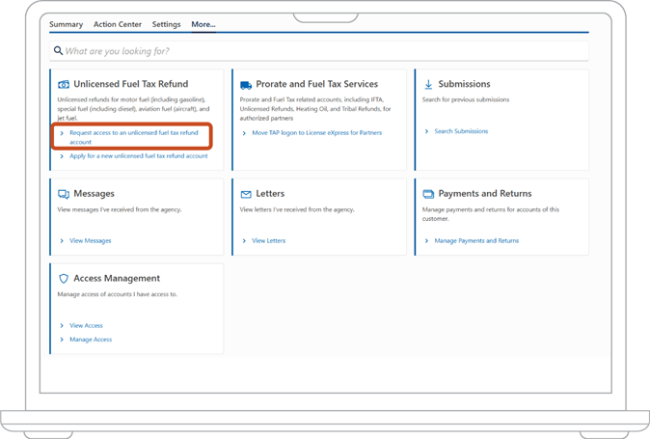
35. Under the “Unlicensed Fuel Tax Refund” section, choose the “Request access to an unlicensed fuel tax refund account” hyperlink.
36. On the account verification screen, choose either the “Start Account Verification” button or the “Start” button.
37. The account verification screen will provide an overview of required information. When you finish reviewing the instructions, choose the “Next” button.

38. You must select a Request Type. There are 2 different options:
- Access Information – Jump to step 39.
- Access Code – Jump to step 48.
Account information method
39. Select “Account Information” then choose “Next.”
40. From the Validation screen, in the Customer Information section, select an ID type to verify your account with. This can be your Employer ID Number (EIN), PRFT Customer ID, Unified Business ID (UBI), or Social Security Number associated with your account.
41. Under the Account Information section, select the unlicensed refund “Account Type” from the drop-down menu. Then enter the fuel tax “Account ID” number.
42. Once that is entered, you will need to provide one of the following types of information about the most recent period that was filed:
- Net refund amount
- No Previous Returns
- Net Cost
- Refundable Fuel
Choose the “Next” button.

43. Choose whether you want to appoint a service agent.
- If “Yes,” jump to step 44.
- If “No,” jump to step 46.
44. On the account verification screen, choose either the “Start Service Agent” button or the “Start” button under the “Service Agent” section.
45. Enter the following information:
- In the dropdown menu under “ID Type,” select the type of ID number your service agent uses for their federal taxes. This may be the service agent’s Social Security number (SSN) or an Employer ID Number. The Employer ID number will be the service agent’s federal Employee Identification Number (EIN).
- Under “ID,” enter their EIN or SSN.
- In the dropdown menu under “Effective From,” select the date on which the power of attorney (POA) form was signed and notarized.
- To attach the POA form, choose the cloud icon to upload from the cloud or drag your file to upload it.
- Enter your service agent’s contact email.
- In the dropdown menu under “Country,” select the country for the service agent’s phone number. License Express will automatically select “USA.”
- In the dropdown menu under “Phone Type,” choose your service agent’s phone type from the options.
- Enter your service agent’s phone number and extension number (if applicable).
- Enter your service agent’s physical address. This should be the exact same address that the service agent has under their own account.
- Choose the “Next” button.
46. Choose Submit to complete the request or Edit/Review if you need to make changes.
Note: Once you select Submit you will not be able to make changes.

47. After you submit you will be given a confirmation number. Choose the OK button from the bottom right corner to return to the Add Access screen.

Access code method
48. Select “Access Code” then choose “Next.”
49. From the Validation screen, in the Customer Information section, select an ID type to verify your account with. This can be your Employer ID Number (EIN), PRFT customer ID, Unified Business ID (UBI), or for Sole Proprietors the Social security Number associated with your account.
50. Under the Account Information section, select “Account Type” from the drop-down menu. Then enter the “Account ID” number.
51. Once that is entered, you will need to provide the “Access Code” that was granted by the manager or administrator of the account holder. You will need to enter the following:
- Access level that was granted
- Access code that was generated
- Choose the “Next” button.
52. Choose whether you want to appoint a service agent.
- If “Yes,” jump to step 53.
- If “No,” jump to step 55.
53. On the account verification screen, choose either the “Start Service Agent” button or the “Start” button under the “Service Agent” section.
54. Enter the following information:
- In the dropdown menu under “ID Type,” select the type of ID number your service agent uses for their federal taxes. This may be the service agent’s Social Security number (SSN) or an Employer ID Number. The Employer ID number will be the service agent’s federal Employee Identification Number (EIN).
- Under “ID,” enter their EIN or SSN.
- In the dropdown menu under “Effective From,” select the date on which the power of attorney (POA) form was signed and notarized.
- To attach the POA form, choose the cloud icon to upload from the cloud or drag your file to upload it.
- Enter your service agent’s contact email.
- In the dropdown menu under “Country,” select the country for the service agent’s phone number. License Express will automatically select “USA.”
- In the dropdown menu under “Phone Type,” choose your service agent’s phone type from the options.
- Enter your service agent’s phone number and extension number (if applicable).
- Enter your service agent’s physical address. This should be the exact same address that the service agent has under their own account.
- Choose the “Next” button.
55. Choose Submit to complete the request or Edit/Review if you need to make changes.
Note: Once you select Submit you will not be able to make changes.
56. After you submit you will be given a confirmation number. Choose the OK button from the bottom right corner to return to the Add Access screen.

Part 4: After you register your existing accounts
57. After returning to the Add Access screen, select the home icon labeled “License Express for Partners or Individuals” at the top of the page to view your Summary Screen.
This screen displays all the Prorate and Fuel tax accounts that you have registered for online access.
Note: If you do not see the account, you have requested access to under your Summary screen, a PRFT staff member will need to approve the request before it is linked to your License Express web log on.