Before you get started
This guide is for existing customers who have a fuel tax account (either aircraft distributor, fuel blender, fuel carrier, fuel distributor, fuel supplier, or fuel terminal operator) and want to file a return in License Express.
Filing a return involves reporting the following transactions about your motor, special, and dyed special fuel usage:
- monthly fuel sales
- distributions
- imports
- exports
Here are the fuel types that you will be reporting your usage information about in this return:
| Fuel type | Description |
|---|---|
| Motor fuel | Any liquids commonly or commercially known, produced, exchanged, or sold as gasoline or defined as gasoline in statute. Ethanol and ethanol blends are included in this category. |
| Special fuel | Any liquids commonly or commercially known, produced, exchanged, sold, or used as fuel in diesel engines. Biodiesel, biodiesel blends, and renewable diesel are included in this category. |
| Dyed special fuel | Any special fuel product with red dye added to indicate that the fuel does not include federal or state fuel taxes. |
You can learn more about fuel tax compliance, including definitions, tax return information, supporting document instructions, due dates to report, and payment options, in the Fuel Tax Compliance Manual.
If you previously used Taxpayer Access Point (TAP) to manage your account and complete other transactions, these guides would teach you how to set up a License Express account:
- How to set up a License Express account for your business
- How to set up a License Express account as a service agent
If you have never used TAP to manage your account, you can learn how to register with License Express using this guide:
- How to register an existing fuel tax customer with an active account
If you’re a service agent acting on behalf of a fuel tax customer, you can follow the same instructions as the taxpayer.
Gather the required information
To file a fuel tax return in License Express, you will need:
- Tax-paid/Tax Exempt receipts.
- Information about all fuel receipts (amounts of fuel you received, including imports from another state) and disbursements (amounts of fuel you sold or delivered) for the reporting period. This information may include the following (when applicable):
- Schedule
- Product Code
- Fuel Type
- Carrier Name
- Carrier FEIN
- Hired By Name
- Hired By FEIN (Federal Employee Identification Number)
- Rail Car#/Vessel Id
- Mode
- Origin City
- Origin State
- Origin Terminal
- Destination City
- Destination State
- Destination Terminal
- Seller Name
- Seller FEIN
- Buyer Name
- Buyer FEIN
- Date Received/ Shipped
- Document #
- Net Gallons
- Gross Gallons
- Billed Gallons
- Position Holder Name
- Position Holder FEIN
*You should report all fuel amounts in gallons that are rounded off the nearest whole gallon. For example, 3.4 gallons would become 3 gallons, while 3.5 gallons would become 4 gallons. To convert liters into gallons, divide the number of liters by 3.785.
To learn more details about the required information, such as types of schedules, product codes, modes, etc., consult the Fuel Tax Compliance Manual.
You can enter receipt and disbursement information directly into License Express, or you can use a tax return template (i.e., Excel spreadsheet) specific to your type of fuel tax account and upload this file as an attachment into License Express. Here is how to submit fuel tax information with a template.
If you are setting up an account for yourself and appointing a service agent, or if you are registering on behalf of someone else as a service agent, you’ll also need:
- The service agent’s Federal Employer Identification Number (FEIN) or Social Security number (SSN)—whichever they use when they pay their federal taxes
- The service agent’s contact information
- An electronic copy of a signed and notarized power of attorney (POA) assignment form that authorizes the service agent to manage your account
Submitting fuel tax return using a template
1. Use a template to submit your fuel tax return based on the type of fuel tax account you have:
- Aircraft Distributor tax return template
- Fuel Blender tax return template
- Fuel Carrier tax return template
- Fuel Distributor tax return template
- Fuel Supplier tax return template
- Fuel Terminal Operator tax return template
2. When the template file downloads into your web browser, open it and save a copy so that you can enter the required information from your receipts and disbursements. Make sure to save the template as xls or xlsx versions. Other excel versions will give an error when trying to upload the template.
When to file your fuel tax return
Fuel tax returns are due by the 25th of each month, however, if one of these dates is a Sunday or holiday, your return will be due on the next business day. You can submit the fuel tax return online or by mail by 11:59 p.m. Pacific Standard Time (PST).
See fuel tax return and EFT due dates for the current year.
When to pay taxes
If you owe taxes after filing your fuel tax return, you can learn how to pay online through this guide, or you may mail a check. The check should be made out to the Department of Licensing and mailed to:
Department of Licensing
Prorate and Fuel Tax Services
P.O. Box 9048
Olympia, WA 98507-9048
We must receive your tax payments on or before the EFT due dates.
- If you owe $50,000 or more, pay only by electronic funds transfer (EFT)
- If you owe less than $50,000, pay by check, money order, or EFT
Contact your bank to set up EFT payments. You must make a separate payment for each license type.
Fuel tax return taxes are due by 11:59 p.m. Pacific Standard Time (PST) on the EFT due date. To see the EFT due dates, follow the link that was provided for the fuel tax return dates above.
If you pay after 11:59 p.m., it may not be posted to your account until the following day.
After you finish your filing online, you don't need to mail your return. In fact, doing so may make it take longer to process.
Late payments
There is a penalty fee for late payments. The amount of this fee depends on when you file your return.
The table below shows the late payment fees. For example, if you file a September return and owe $100 in taxes on:
- October 31, then you’ll owe a 10% fee—or $110
- November 1, then you’ll owe a 10% fee plus 1% interest per month—or $121
| If you don't pay by | You'll owe |
|---|---|
| Due date | 10% penalty |
| First day of the next month | 10% penalty and 1% interest per month |
File a fuel supplier/distributor/blender or aircraft distributor fuel tax return
Follow the steps below to file a fuel supplier/distributor/blender or aircraft distributor fuel tax return for your business, government agency, or sole proprietorship.
At any time, you may choose the “Save Draft” button to save your progress and return to this filing process in the future.
Note: The examples shown are for a fuel suppler account. However, fuel distributor/blender/aircraft distributor all have the same steps.
1. From your License Express dashboard, in the “Account” tab for your fuel supplier account, choose “View Returns.”
2. In the table under “Returns,” choose “File Now” for the period you want to file under.
3. Under “Information,” make sure you have the items you need. Choose the “Next” button.
4. Under “Operations,” indicate whether your organization had operations during the filing period:
- Choose the “Yes” option if you had operations.
- Choose the “No” option if you didn’t have operations.
5. At this stage, you can choose to cancel your fuel tax license. This means the account will no longer be valid after you file your return. All cancellations go into effect on the day of the month you list:
- To keep your fuel tax license, choose “No” then choose the “Next” button. Skip to step 6.
- To cancel your fuel tax license, choose the “Yes” button.
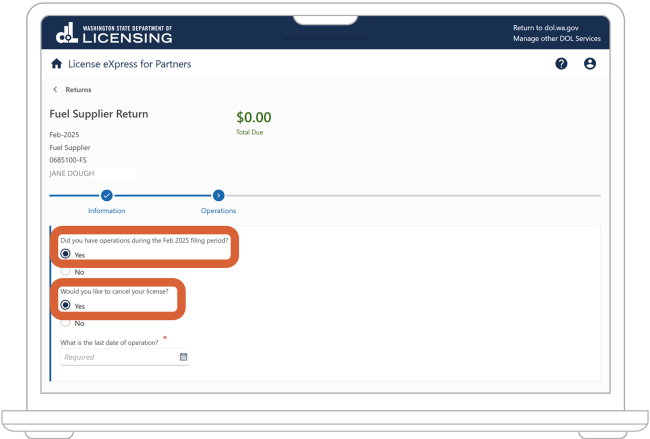
-
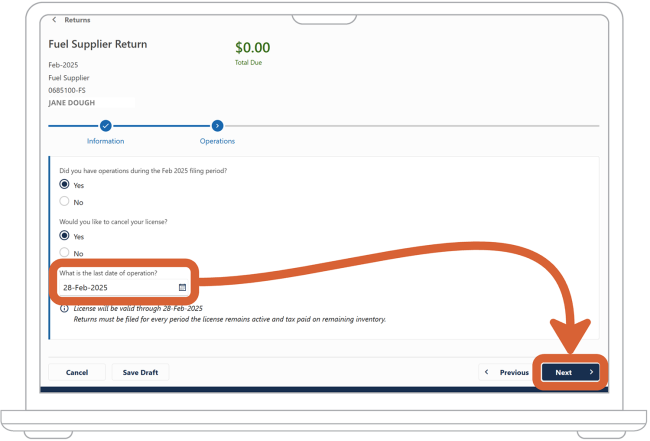
In the dropdown menu under “What is the last date of operation?” enter or select a date. The date should be the last day of the last month you’ll operate.
Note: Your fuel tax account license will be valid through the date you select, and you must file a return and pay taxes on the remaining inventory for every period your license remains active.
-
Choose the “Next” button.
6. Your next step depends on whether your organization has operations during the filing period:
- If your organization didn't have operations during the filing period, skip to step 16.
- If your organization had operations during the filing period, skip to step 7.
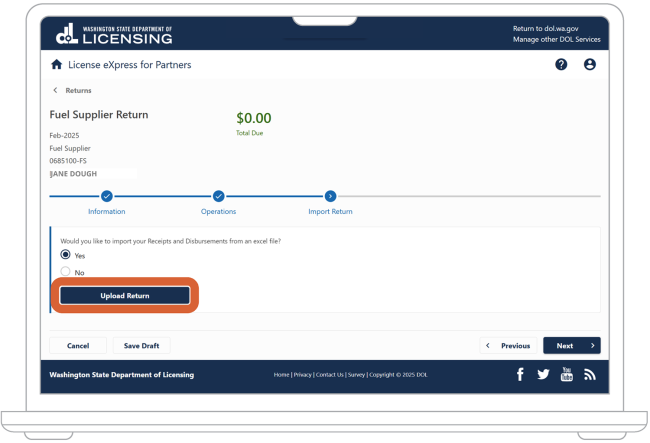
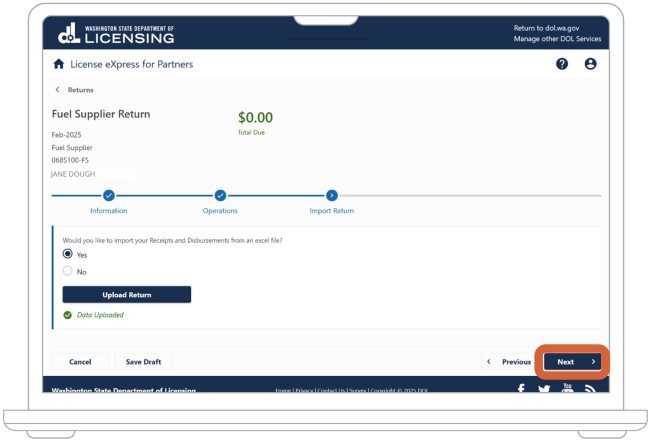
7. If you have had operations during the filing period, at this stage, you can choose how to submit the receipts and disbursement information we need to process your return.
Under “Would you like to import your Receipts and Disbursements from an excel file?” indicate whether you want to import information or enter it manually into License Express.
- Choose the “No” option if you do not want to import a file return template. Then choose “Next.” Skip to step 8.
- Choose “Yes” if you want to import a file return template.
- Choose the “Upload Return” button.
- Choose the “Choose File” button.
- Pick the template file from your computer then choose the “OK” button.
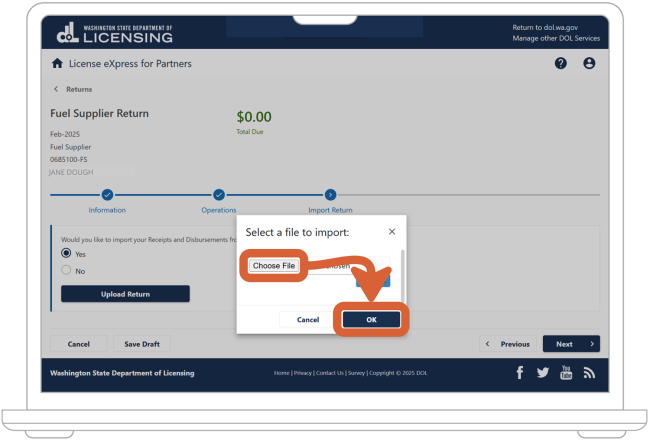
- After you attach your file, the message “Data Uploaded” will appear below the “Upload Return” button. Choose the “Next” button.
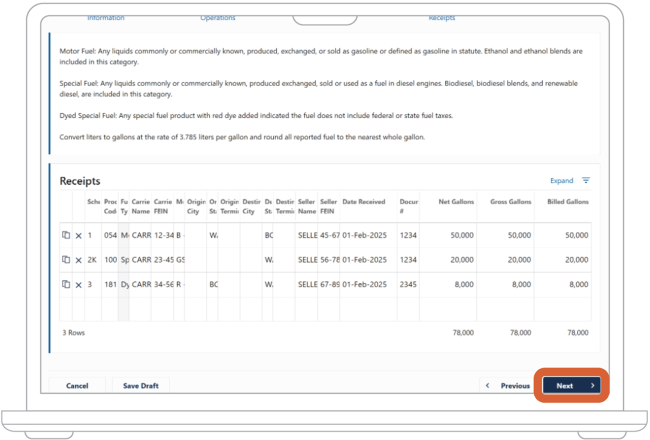
8. On the “Receipts” screen, the amount of taxes you owe based on the receipts information you entered will appear above “Total Due.” If License Express determines that you owe taxes, this amount will appear above in red.
9. In the table under “Receipts,” you can review the receipts information License Express transferred from your tax return template:
- To see the fields of the table fit onto your screen, choose “Condense.”
- To see an expand version of the column headings and their columns, choose “Expand.”
10. Choose the “Next” button.
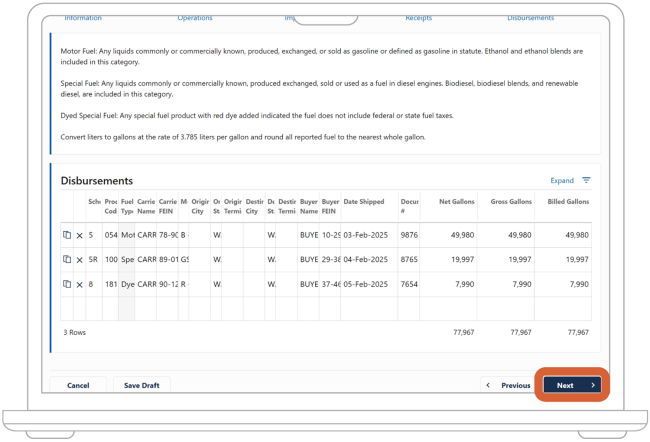
11. On the “Disbursements” screen, the amount of taxes you owe based on the disbursements information you entered will appear above “Total Due.” If License Express determines that we owe you a refund, this amount will appear above in green.
12. In the table under “Disbursements,” you can review the disbursements information License Express transferred from your tax return template:
- To see the fields of the table fit onto your screen, choose “Condense.”
- To see an expanded version of the column headings and their columns, choose “Expand.”
13. Choose the “Next” button.
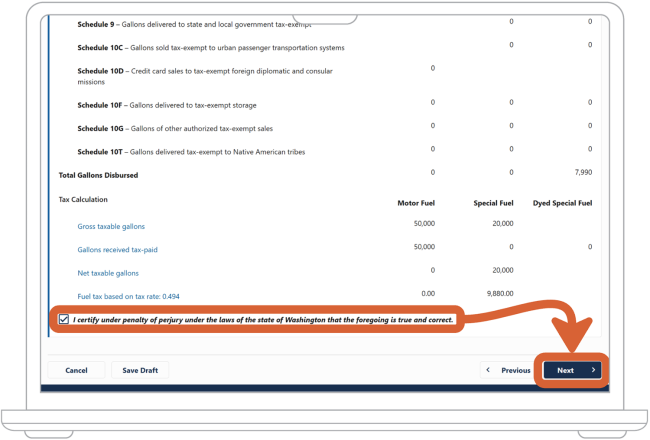
14. On the “Review,” screen, under “Tax Calculation,” review the information you entered for gallons received and gallons disbursed for each type of fuel. At this stage, you can make corrections:
- If you don’t need to make corrections, skip to step 15.
- If you entered receipt/disbursement information directly into License Express, choose the “Previous” button until you return to the appropriate screen. Make your corrections. Then skip to step 14.6.
- If you upload a file tax return template, on your computer, open the tax return template file, then make changes and save your work.
- In License Express, choose the “Previous” button until you return to the “Import Return” screen.
- Repeat steps 8-13 as needed.
- Choose the “Next” button until you have returned to the “Review” screen.

Note: Aircraft distributor and blender accounts will have a section to input the beginning inventory. The aircraft distributor account will state aviation and jet fuel.
15. After you finish your review, click the checkbox to confirm that the information you provided is true and correct. Choose the “Next” button.
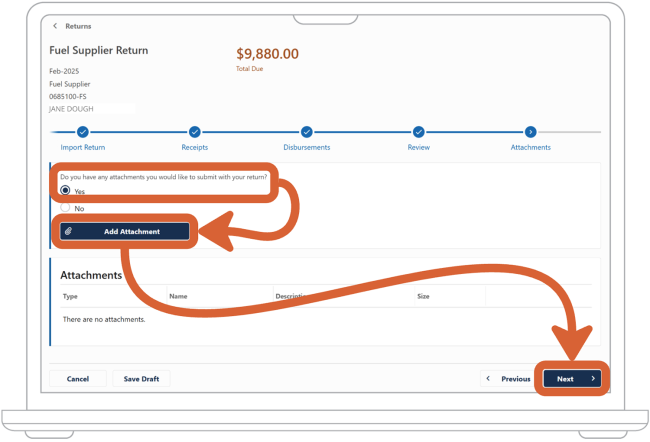
16. Under “Attachments,” indicate whether you want to submit files with your return:
- If you don’t want to upload any files, choose the “No” option and then choose the “Next” button. Skip to step 17.
- If you want to attach files, choose the “Yes” option.
- Choose the “Add Attachment” button.
- In the dropdown menu, select type.
- In the “Name” column, enter the name of the file you’re attaching.
- In the Description column, enter a description of the file you’re attaching.
- For each file you want to attach, repeat steps 16.3 through 16.6.
- When you’re finished, choose the “Next” button.
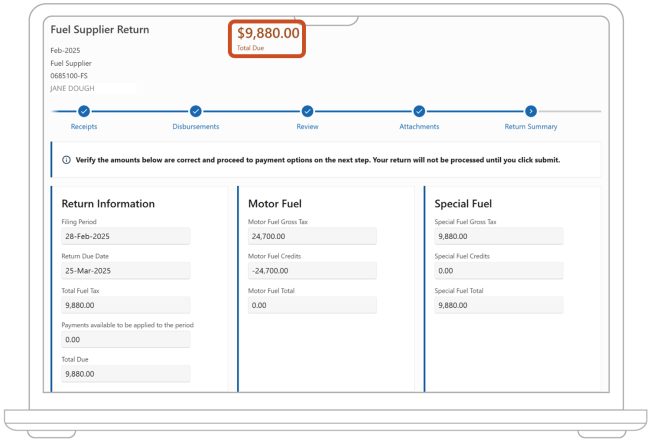
17. Review your return information based on the information you have provided. If you didn’t have operations during the filing period, all the numbers will be 0.
Note: In this section, you will be allowed to add any comments that you would like to provide that may help with your return.
18. Choose the “Submit” button.
19. What you do next will depend on whether you have had operations in this filing period and whether you owe taxes or qualify for a refund:
- If you didn’t have operations during the filing period, you’re now finished with this transaction. You can exit this guide and go back to your License Express dashboard.
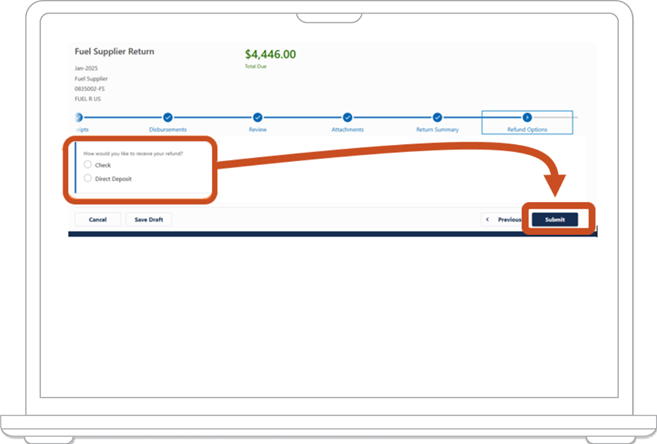
- If you had operations during this filing period and qualify for a refund, you will see the amount we owe you above “Refund.” Go to step 20.
- If you had operations during this filing period and you owe taxes, you will see the total taxes you owe above “Total Due.” Go to step 21.
20. If we owe you a refund, you can decide whether you want us to mail you a check or direct deposit the refund into your bank account. Choose the “Submit” button. You can now exit this guide and go back to your License Express dashboard.
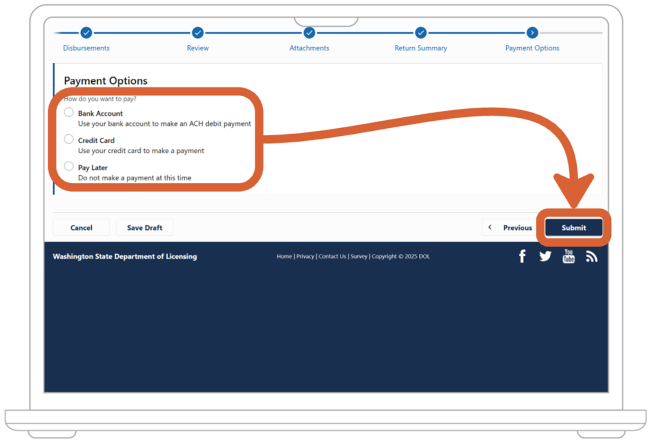
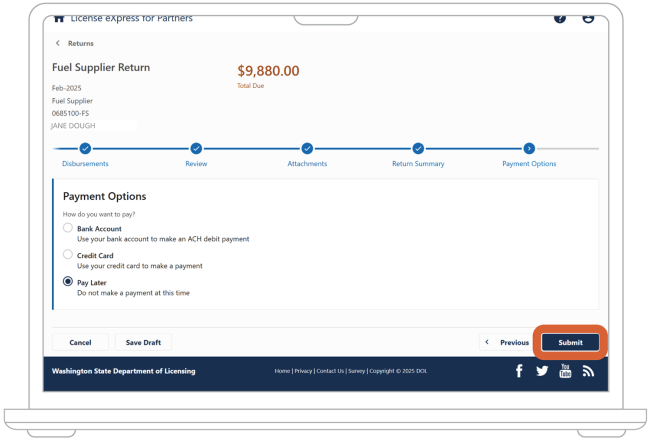
21. Indicate how you want to pay your taxes:
- Choose the "Bank Account” option to pay with your bank account number and routing number.
- Choose the “Credit Card” option to pay using your credit card details.
Note: We’ll also charge a 3% fee.
- Choose the “Pay Later” option to submit your return now and pay your taxes later. To make sure you submit and pay on time, check the tables for filing quarters and due dates and late payment fees.
- After choosing an option, choose the “Submit” button.
22. Your next step will vary depending on which payment option you chose:
- If you chose to pay by bank account, skip to step 23.
- If you chose to pay by credit card, skip to step 24.
- If you chose to pay later, skip to step 25.
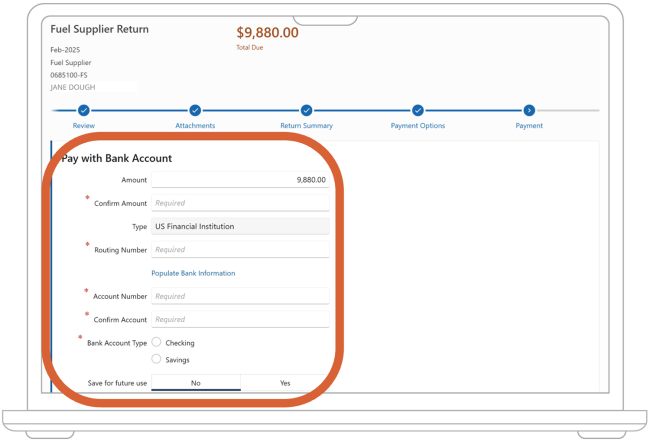
23. Under the “Pay with Bank Account” heading, enter the following information:
- Enter the amount of taxes you want to pay under “Amount” and “Confirm Amount.”
- Enter your bank’s routing number. If you need help finding it, see the image under the “Example Check” heading.
- Enter your bank account number. If you need help finding it, see the image under the “Example Check” heading.
- Confirm your bank account number by reentering it.
- Indicate whether your bank account is a “Checking” or “Savings” account by choosing the appropriate option.
- Next to “Save for future use,” indicate whether you want License Express to save your information for future payments. Choose between the “Yes” and “No” options.
- Toggle the “Certify” option to confirm your bank account information is correct.
- Choose the “Submit” button. You can exit this guide and go back to your License Express dashboard.
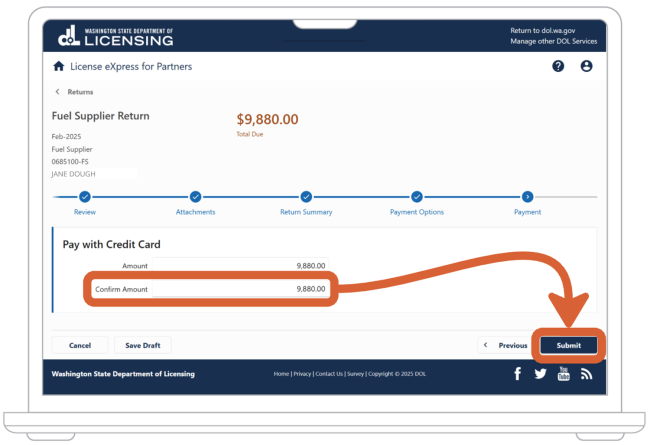
24. Under the “Pay with Credit Card” heading, enter the amount of taxes you want to pay under “Confirm Amount.” Choose the “Submit” button.
To complete your credit card payment, you can read about how to make a payment.
25. Under “Payment Options,” choose the “Pay Later” option. Choose the “Submit” button. You can exit this guide and go back to your License Express dashboard.
File a fuel carrier fuel tax return
Follow the steps below to file a fuel carrier fuel tax return for your business, government agency, or sole proprietorship.
At any time, you may choose the “Save Draft” button to save your progress and return to this registration process in the future. Alternatively, if you decide you do not want to open a new fuel tax account, you may choose the “Delete Account” button to exit the registration process.
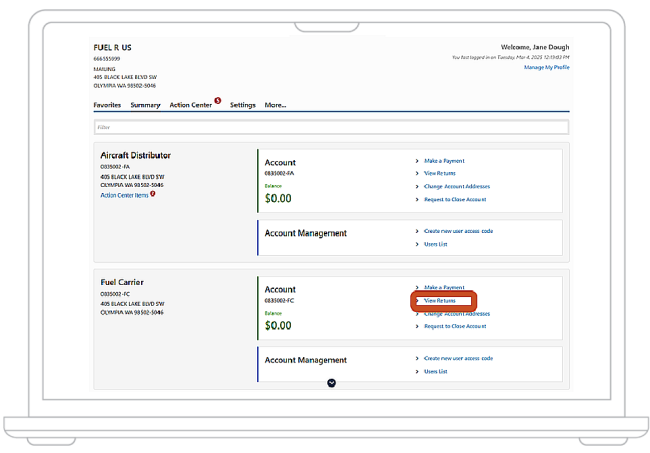
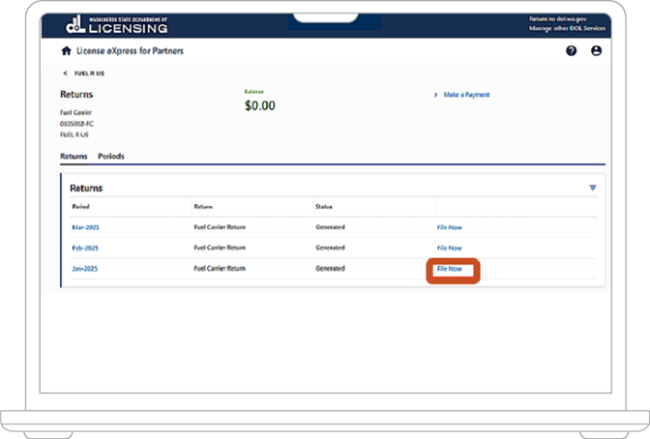
1. From your License Express dashboard, in the “Account” tab for your fuel carrier account, choose “View Returns.”
2. In the table under “Returns,” choose “File Now” for the period you want to file under.
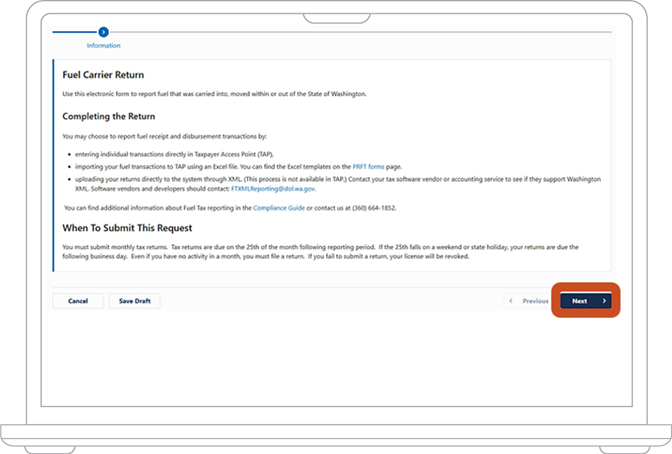
3. Under “Information,” make sure you have the items you need. Choose the “Next” button.
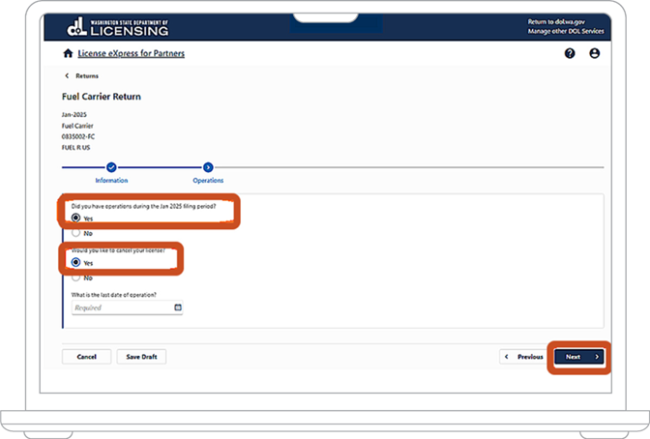
4. Under “Operations,” indicate whether your organization had operations during the filing period:
- Choose the “Yes” option if you had operations.
- Choose the “No” option if you didn’t have operations.
5. At this stage, you can choose to cancel your fuel tax license. This means the account will no longer be valid after you file your return. All cancellations go into effect on the day of the month you list:
- To keep your fuel tax license, choose “No” then choose the “Next” button. Skip to step 6.
- To cancel your fuel tax license, choose the “Yes” button.
- In the dropdown menu under “What is the last date of operation?” enter or select a date. The date should be the last day of the last month you’ll operate.
Note: That your fuel tax account license will be valid through the date you select, and that you must file a return and pay taxes on remaining inventory for every period your license remains active.
- Choose the “Next” button.
6. Your next step depends on whether your organization has operations during the filing period:
- If your organization didn't have operations during the filing period, skip to step 13.
- If your organization had operations during the filing period, skip to step 7.
7. If you have had operations during the filing period, at this stage, you can choose how to submit the receipts and disbursement information we need to process your return.
Under “Would you like to import your information from an excel file?” indicate whether you want to import information or enter it manually into License Express.
- Choose the “No” option if you do not want to import a file return template. Then choose “Next.” Skip to step 8.
- Choose “Yes” if you want to import a file return template.
- Choose the “Upload Return” button.
- Choose the “Choose File” button.
- Pick the template file from your computer then choose the “OK” button.
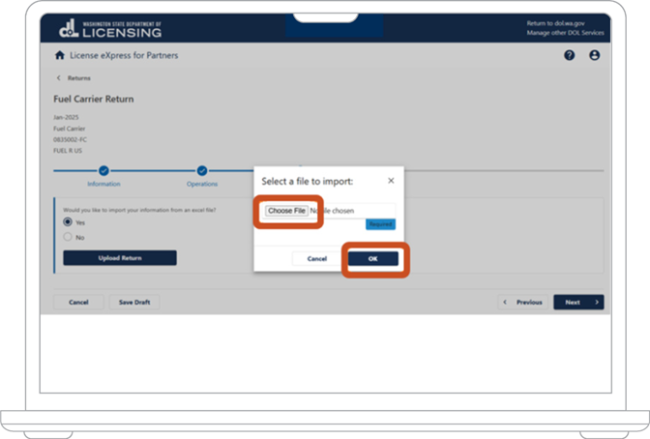
- After you attach your file, the message “Data Uploaded” will appear below the “Upload Return” button. Choose the “Next” button.
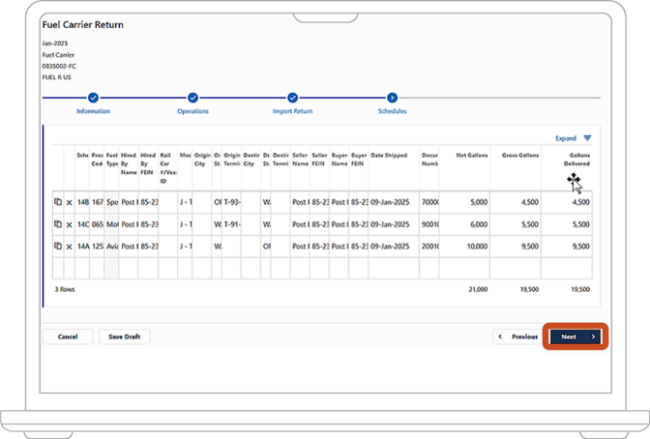
8. In the table under “Schedules,” you can review the information License Express transferred from your tax return template:
- To see the fields of the table fit onto your screen, choose “Condense.”
- To see an expand version of the column headings and their columns, choose “Expand.”
9. Choose the “Next” button.
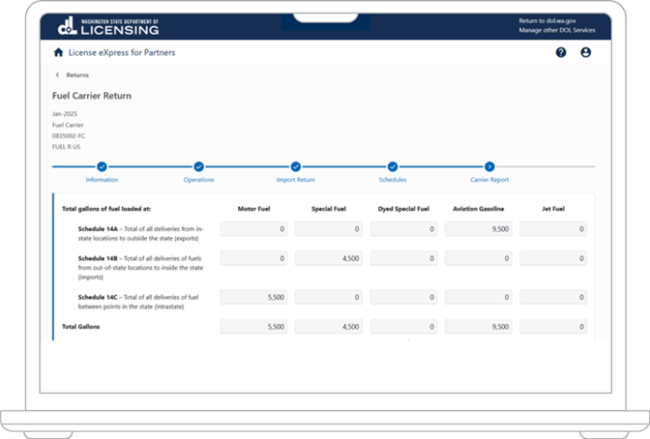
10. On the “Carrier Report” screen, review the information you entered for gallons of fuel loaded for each type of fuel. At this stage, you can make corrections:
- If you don’t need to make corrections, skip to step 12.
- If you entered fuel information directly into License Express, choose the “Previous” button until you return to the appropriate screen. Make your corrections. Then skip to step 10.6.
- If you upload a file tax return template, on your computer, open the tax return template file, then make changes and save your work.
- In License Express, choose the “Previous” button until you return to the “Import Return” screen.
- Repeat step 8 as needed.
- Choose the “Next” button until you have returned to the “Carrier Report” screen.
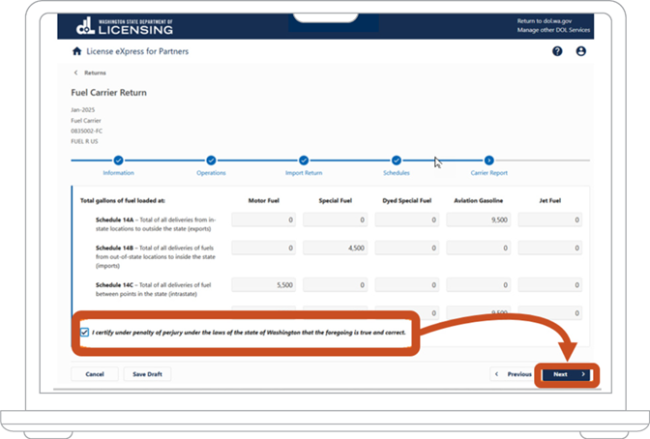
11. After you finish your review, click the checkbox to confirm that the information you provided is true and correct. Choose the “Next” button.
12. Under “Attachments,” indicate whether you want to submit files with your return:
- If you don’t want to upload any files, choose the “No” option and then choose the “Next” button. Skip to step 12.
- If you want to attach files, choose the “Yes” option.
- Choose the “Add Attachment” button.
- In the dropdown menu, select type.
- In the “Name” column, enter the name of the file you’re attaching.
- In the Description column, enter a description of the file you’re attaching.
- For each file you want to attach, repeat steps 12.3 through 12.6.
- When you’re finished, choose the “Next” button.

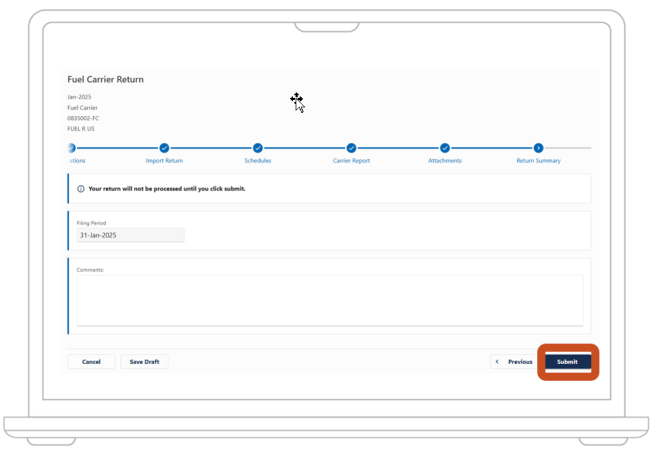
13. On the “Return Summary” screen, verify that you filed under the correct period.
Note: In this section, you will be allowed to add any comments that you would like to provide that may help with your return.
Choose the “Submit” button.
File a fuel terminal operator fuel tax return
Follow the steps below to file a fuel terminal fuel tax return for your business, government agency, or sole proprietorship.
At any time, you may choose the “Save Draft” button to save your progress and return to this registration process in the future. Alternatively, if you decide you do not want to open a new fuel tax account, you may choose the “Delete Account” button to exit the registration process.
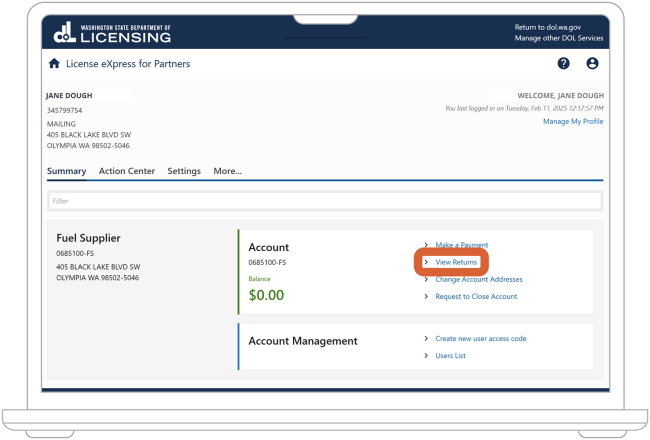
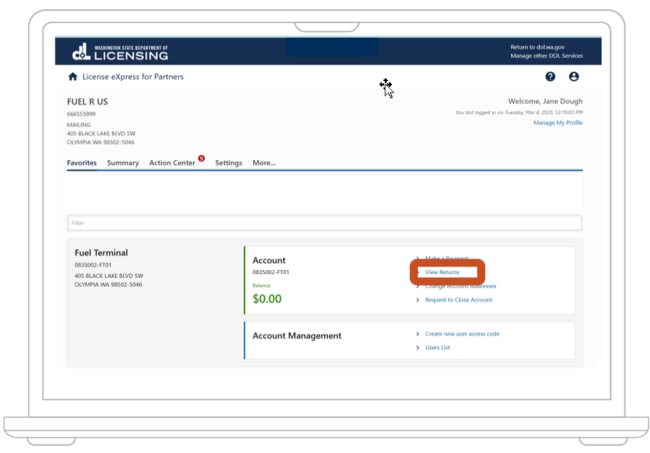
1. From your License Express dashboard, in the “Account” tab for your fuel terminal account, choose “View Returns.”
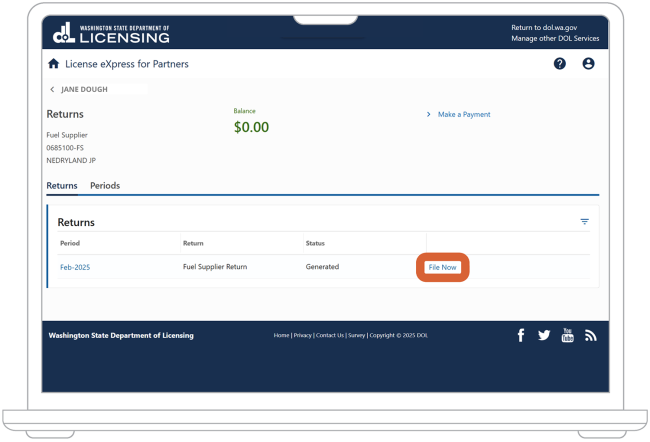
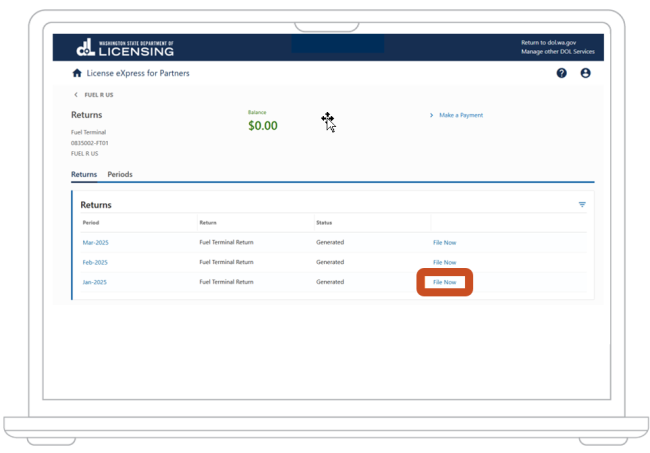
2. In the table under “Returns,” choose “File Now” for the period you want to file under.
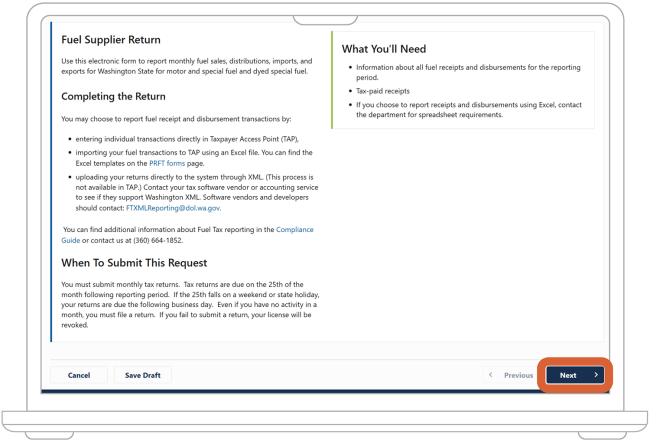
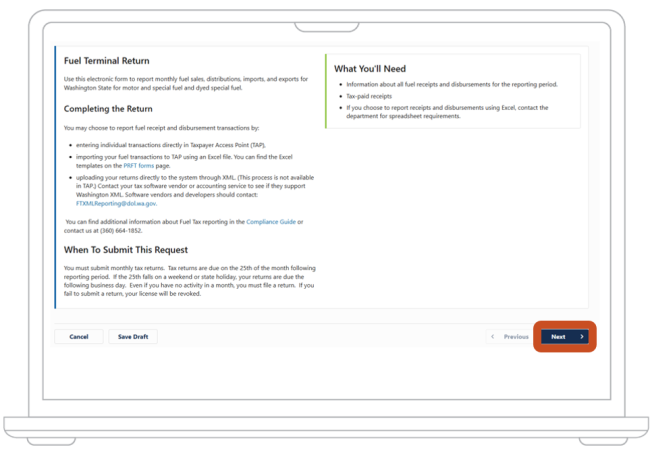
3. Under “Information,” make sure you have the items you need. Choose the “Next” button.
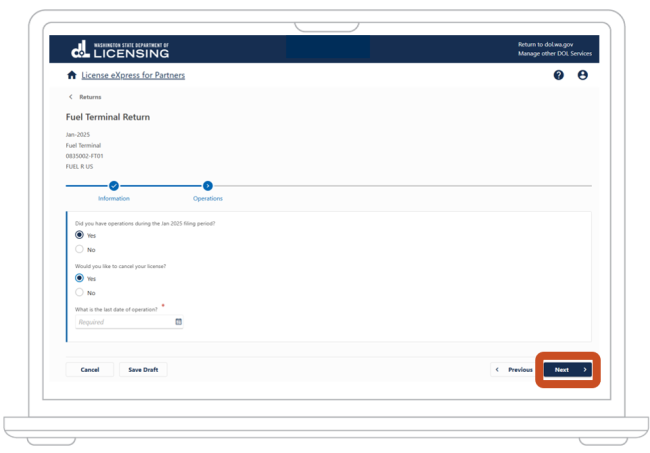
4. Under “Operations,” indicate whether your organization had operations during the filing period:
- Choose the “Yes” option if you had operations.
- Choose the “No” option if you didn’t have operations.
5. At this stage, you can choose to cancel your fuel tax license. This means the account will no longer be valid after you file your return. All cancellations go into effect on the day of the month you list:
- To keep your fuel tax license, choose “No” then choose the “Next” button. Skip to step 6.
- To cancel your fuel tax license, choose the “Yes” button.
- In the dropdown menu under “What is the last date of operation?” enter or select a date. The date should be the last day of the last month you’ll operate.
Note: That your fuel tax account license will be valid through the date you select, and that you must file a return and pay taxes on remaining inventory for every period your license remains active.
Choose the “Next” button.
6. Your next step depends on whether your organization has operations during the filing period:
- If your organization didn't have operations during the filing period, skip to step 15.
- If your organization had operations during the filing period, skip to step 7.
7. If you have had operations during the filing period, at this stage, you can choose how to submit the receipts and disbursement information we need to process your return.
Under “Would you like to import your Receipts and Disbursements from an excel file?” indicate whether you want to import information or enter it manually into License Express.
- Choose the “No” option if you do not want to import a file return template. Then choose “Next.” Skip to step 8.
- Choose “Yes” if you want to import a file return template.
- Choose the “Upload Return” button.
- Choose the “Choose File” button.
Pick the template file from your computer then choose the “OK” button.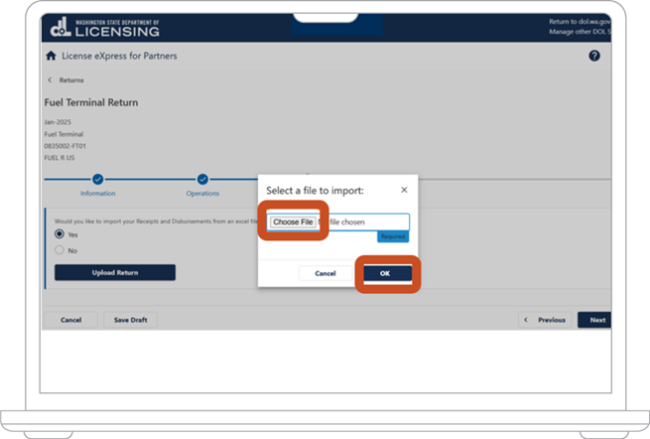
- After you attach your file, the message “Data Uploaded” will appear below the “Upload Return” button. Choose the “Next” button.
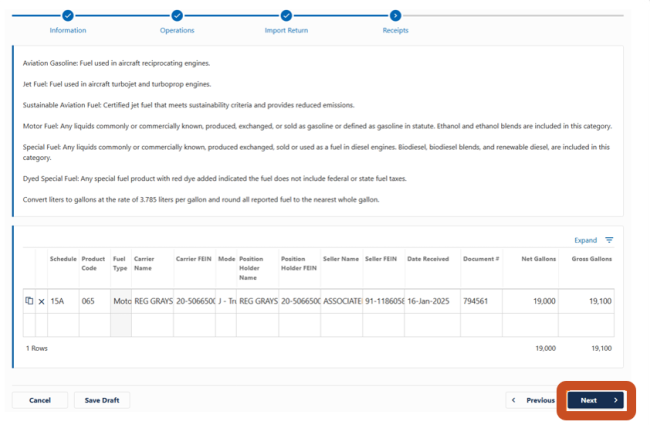
8. In the table under “Receipts,” you can review the receipts information License Express transferred from your tax return template:
- To see the fields of the table fit onto your screen, choose “Condense.”
- To see an expand version of the column headings and their columns, choose “Expand.”
Choose the “Next” button.
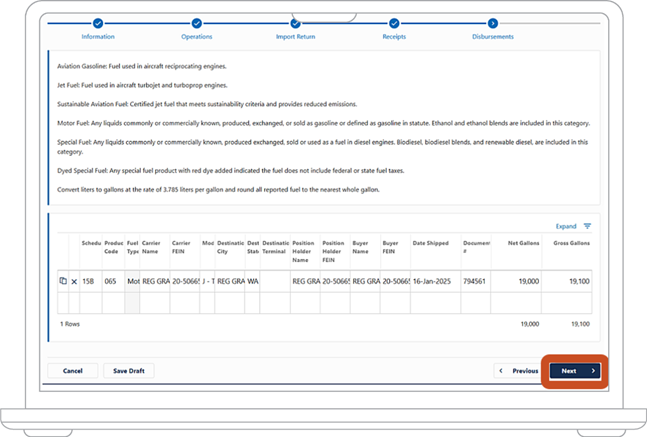
9. In the table under “Disbursements,” you can review the disbursements information License Express transferred from your tax return template:
- To see the fields of the table fit onto your screen, choose “Condense.”
- To see an expand version of the column headings and their columns, choose “Expand.”
Choose the “Next” button.
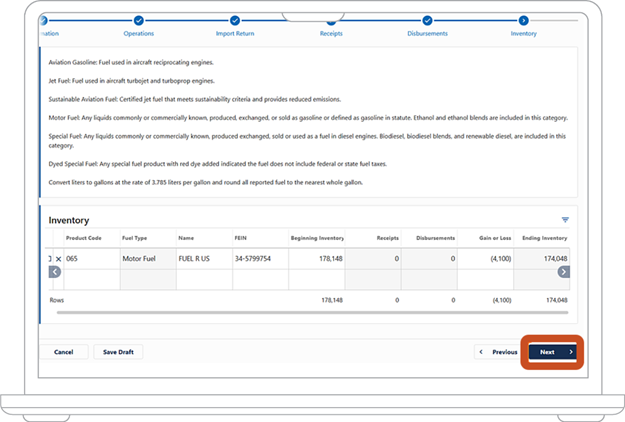
10. On the “Inventory” screen you can review the inventory information License Express transferred from your tax return template. Choose the “Next” button.
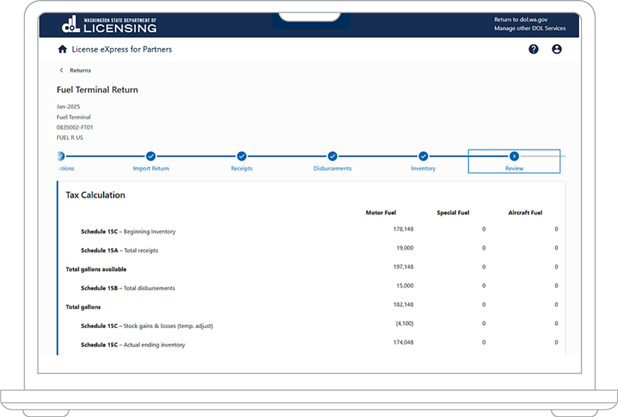
11. On the “Review,” screen, under “Tax Calculation,” review the information you entered for gallons received, gallons disbursed, and inventory for each type of fuel. At this stage, you can make corrections:
- If you don’t need to make corrections, skip to step 14.
- If you entered receipt/disbursement information directly into License Express, choose the “Previous” button until you return to the appropriate screen. Make your corrections. Then skip to step 11.6.
- If you upload a file tax return template, on your computer, open the tax return template file, then make changes and save your work.
- In License Express, choose the “Previous” button until you return to the “Import Return” screen.
- Repeat steps 8- 10 as needed.
- Choose the “Next” button until you have returned to the “Review” screen.
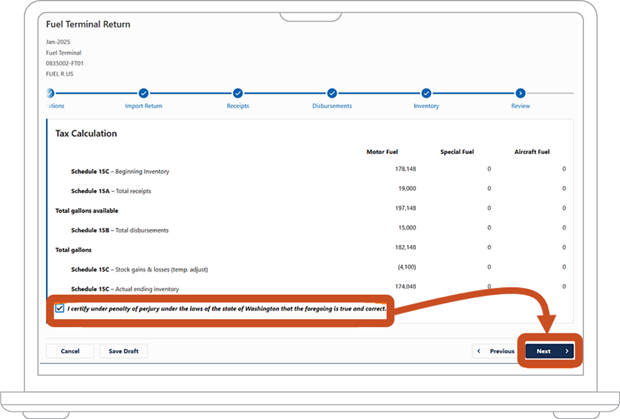
12. After you finish your review, click the checkbox to confirm that the information you provided is true and correct. Choose the “Next” button.
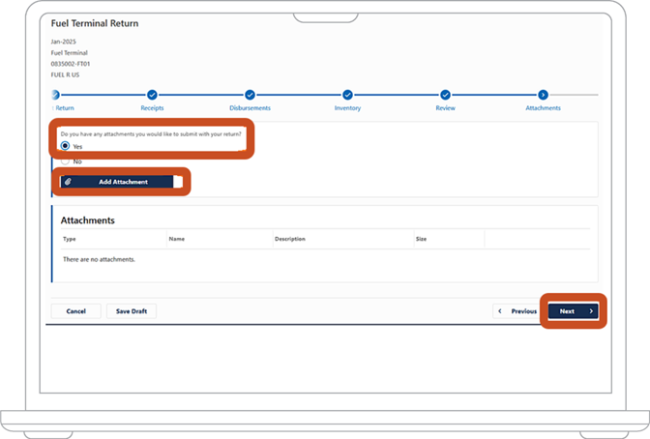
13. Under “Attachments,” indicate whether you want to submit files with your return:
- If you don’t want to upload any files, choose the “No” option and then choose the “Next” button. Skip to step 16.
- If you want to attach files, choose the “Yes” option.
- Choose the “Add Attachment” button.
- In the dropdown menu, select type.
- In the “Name” column, enter the name of the file you’re attaching.
- In the Description column, enter a description of the file you’re attaching.
- For each file you want to attach, repeat steps 13.3 through 13.6.
- When you’re finished, choose the “Next” button.
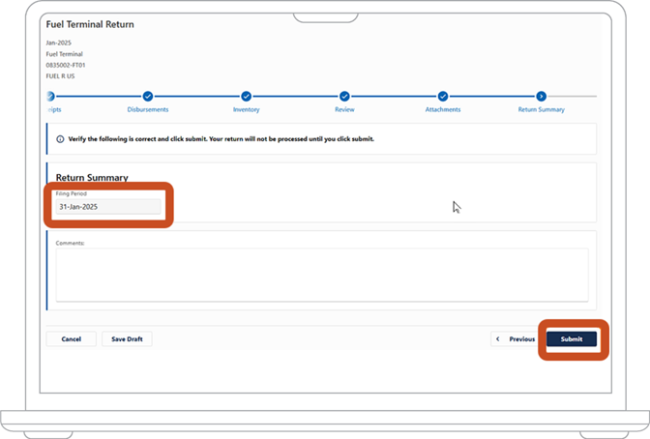
14. On the “Return Summary” screen, verify that you filed under the correct period.
Note: In this section, you will be allowed to add any comments that you would like to provide that may help with your return.
Choose the “Submit” button.