
Before you get started
This guide is for existing IRP customers who want to add vehicles to their account in License Express. You'll learn about the 3 main steps in this process:
- Choosing your jurisdictions
- Setting your vehicle weight template
- Adding a vehicle to your account
Visit the International Registration Plan, Inc. (IRP Inc) website if you have questions about:
- IRP registration
- Vehicle types
- Weight requirements
- Jurisdiction weights and maximum operating weights
- Commercial or combination use
- Other IRP topics
If you previously used Taxpayer Access Point (TAP) to manage your IRP account and complete other transactions, you can learn:
Gather the required information
To add vehicles to your IRP account in License Express, you’ll need:
- Washington vehicle registration (Validated Copy of Record) for each vehicle, which includes the following information:
- Vehicle identification number (VIN)
- Unladen weight
- Gross vehicle weight (GVW)
- Number of axles
- Purchase date
- Purchase price
- A current, stamped copy of the Federal Heavy Vehicle Use Tax form (2290) from the IRS for all vehicles with:
- A combined gross vehicle weight of 55,000 lbs. or more
- A purchase date of 60 days or more
- A new lease agreement, if your vehicle is leased:
- If the leased vehicle is no longer under the jurisdiction of the U.S. Department of Transportation (USDOT), you’ll also need a Leased Vehicle listing form
- A signed cab card or gross weight certificate, if the previous owner gave you permission to use their registration credit
- The number of miles each vehicle drove in each jurisdiction
If you’re a service agent acting on behalf of an IRP customer who wants to add vehicles to their account, you can follow the same instructions as the account owner.
Choose your jurisdictions
Before you can add vehicles to your account, you’ll need to choose which jurisdictions they operate in.
Jurisdictions are the places your vehicles traveled in during the reporting period. To determine the fees you owe for each vehicle, we’ll need to know:
- Where you drove (the jurisdictions you traveled in)
- How many miles you traveled in each jurisdiction
If you already chose jurisdictions, skip to set your vehicle weight template.
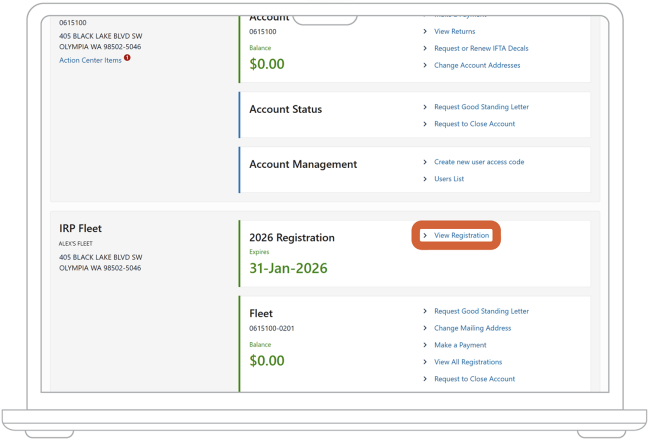
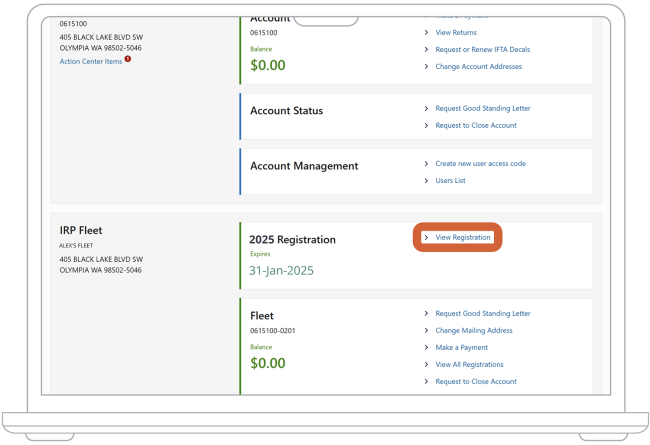
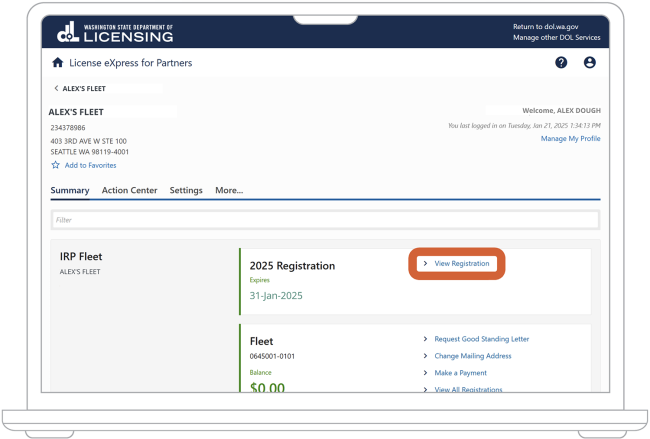
1. On the “Summary” page, find the “IRP Fleet” heading. Then in the “Registration” section, choose “View Registration.”
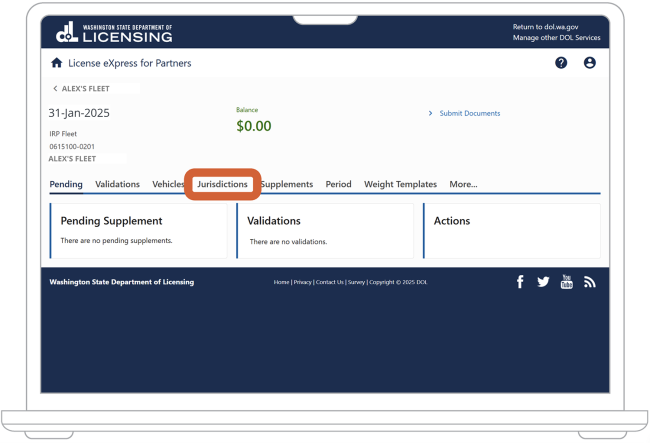
2. In the main navigation, choose “Jurisdictions.”
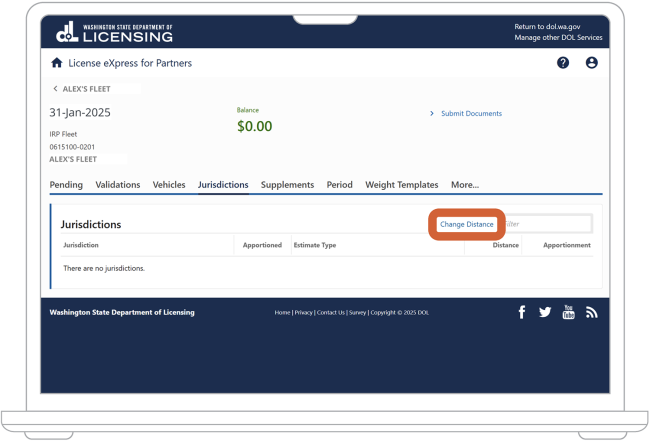
3. Choose “Change Distance.”
4. Distance means the total miles (mileage) your vehicle traveled in each jurisdiction:
a. If you’re a new carrier, License Express will automatically select “Use Estimated Distances” since you haven't reported distance yet. Choose the “Next” button and skip to step 5.
b. If you’re an established carrier with previous operations, choose “Use Actual Distance.”
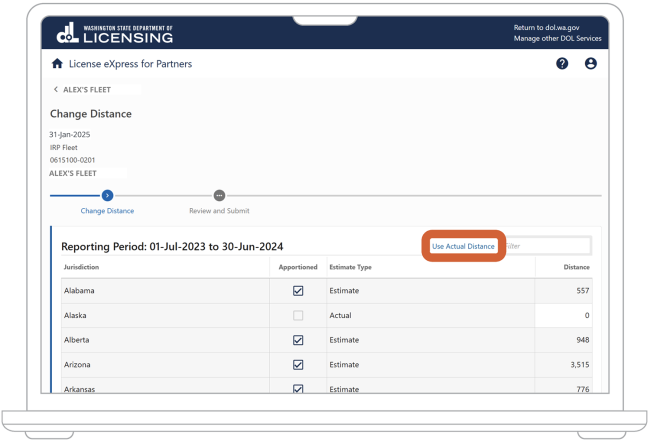
c. In the “Distance” column of the reporting period table, enter the actual mileage for each jurisdiction you traveled in. You can find these mileage values in your renewal packet.
d. When you're finished, choose the “Next” button.
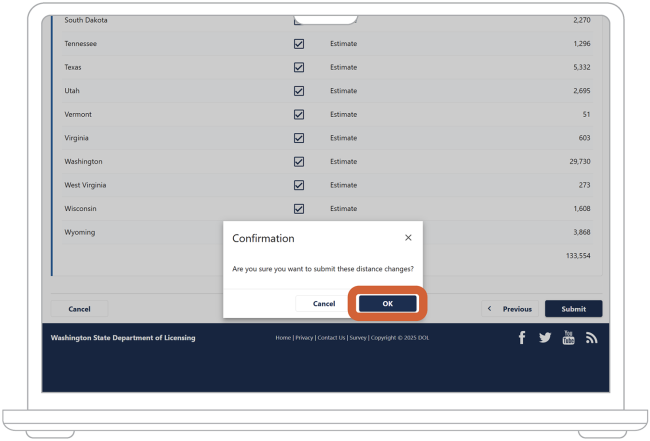
5. In the “Confirmation” popup, choose the “OK” button to confirm the distance you entered.
6. If you need to set your vehicle weight template, choose “Weight Templates” in the main navigation. Skip to step 2 under set your vehicle weight template.
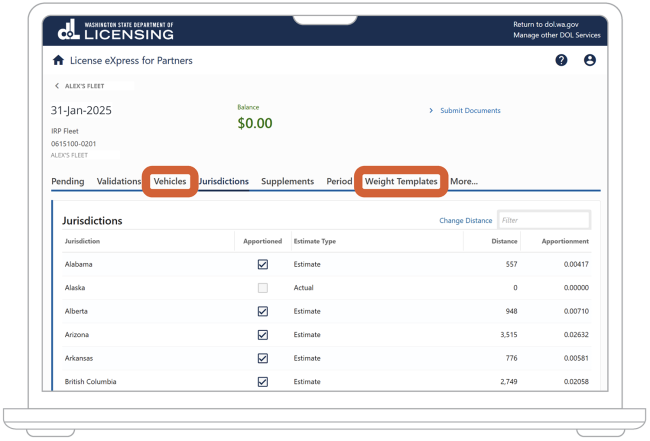
If you already set your vehicle weight template, choose “Vehicles” in the main navigation. Skip to step 2 under add a vehicle to your account.
Set your vehicle weight template
After you choose jurisdictions, you can set weight templates for your vehicles in each jurisdiction.
You can categorize vehicles by weight in 3 ways:
- Use default weights for Washington state
- Use the maximum weight ranges for all jurisdictions
- Use a custom weight template that you can create and change as needed
If you already set your vehicle weight templates or want to enter the vehicle’s weights manually instead, skip to add a vehicle to your account. Otherwise follow the steps below to set your vehicle weight template in your IRP account in License Express.
1. On the “Summary” page, find the “IRP Fleet” heading. Then in the “Registration” section, choose “View Registration.”
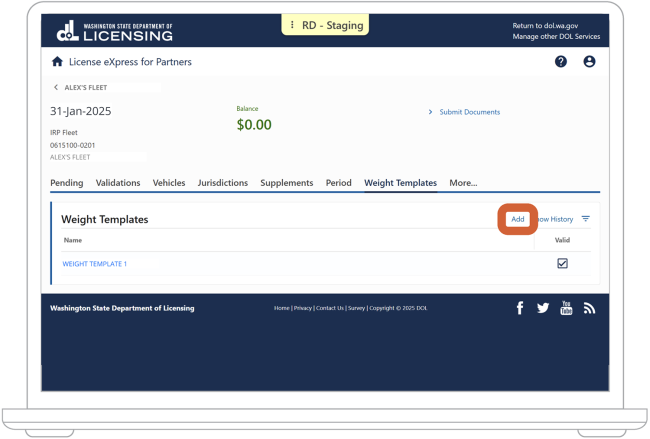
2. In the main navigation, choose “Weight Templates.”

3. Next to the “Weight Templates” heading, choose “Add.”
4. Under “Attributes,” enter the following information:
- Enter the name of your weight template. Choose a name that makes sense to you. For example, if you have a set of trucks that deliver apples and are in the same weight group, you might name their weight template “Apple Truck.”
- Optional: Enter your gross vehicle weight (GVW). This is the combined weight of your vehicles, passengers, and cargo.
- Enter the number of axles your vehicles have.
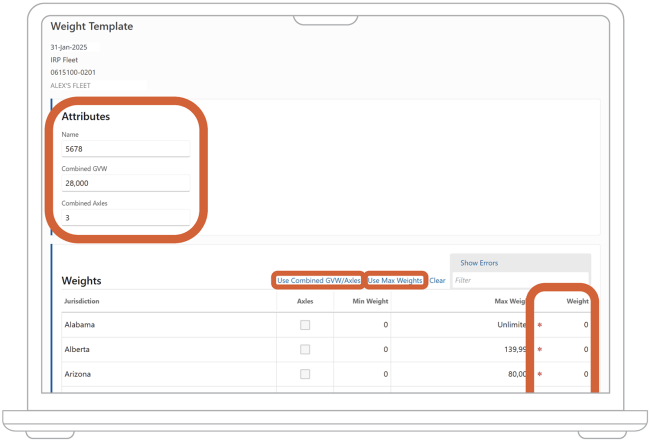
5. Choose the “Save” button.
6. After setting your vehicle weight template, go to add a vehicle to your account.
Add vehicles to your account
After choosing jurisdictions and setting your weight template, you can add vehicles to your account.
In some cases, you’ll need to follow this process for vehicles you previously added to your account. This includes:
- Vehicles with IRP registrations that have been expired for 1 year or more
- Vehicles you deleted from License Express
1. On the “Summary” page, find the "IRP Fleet” heading. Then in the “Registration” section, choose “View Registration.”
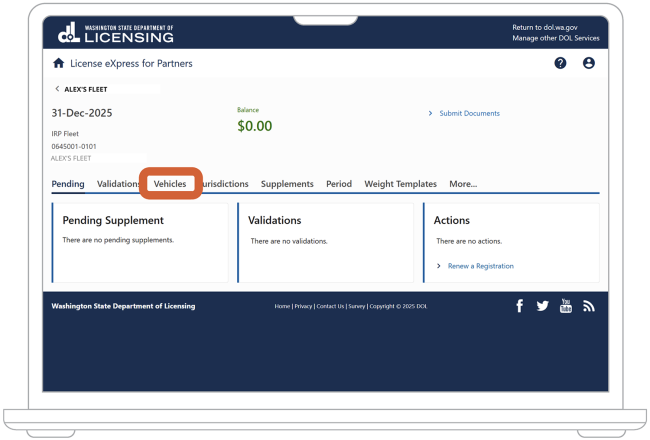
2. In the main navigation, choose “Vehicles.”
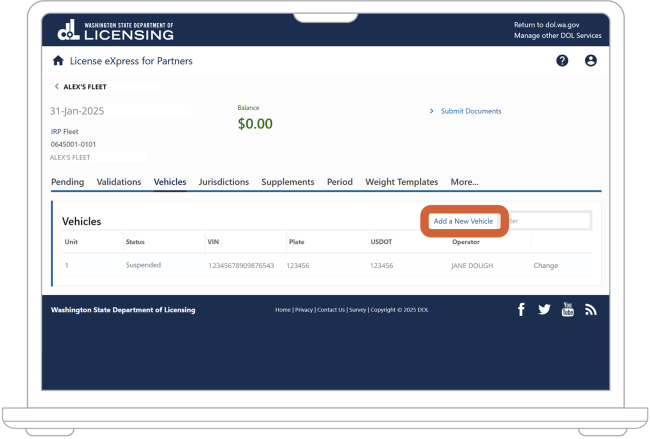
3. Next to the “Vehicles” heading, choose “Add a New Vehicle.” Then choose the “Amend” button, which will appear in the top right.
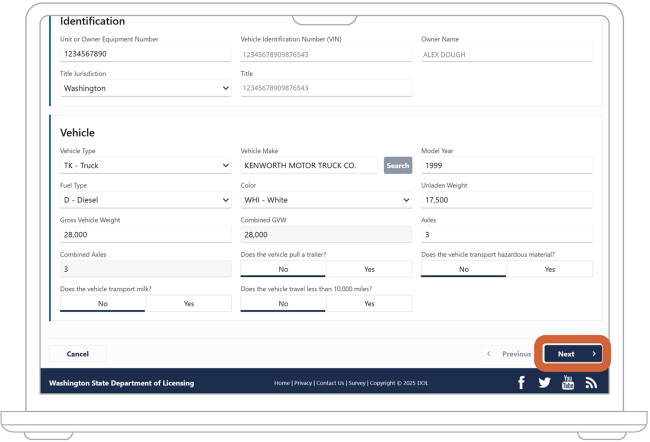
4. Under the “Identification” heading, enter the following information from your vehicle registration:
- Enter the unit or owner equipment number.
- Enter the VIN. In some cases, License Express can use the VIN to auto-fill some of the information we need, such as “Title,” “Vehicle Make,” “Model Year,” “Fuel Type,” “Color,” and “Unladen Weight.” If License Express doesn’t auto-fill any or all of this information, you’ll need to enter it.
- Enter the vehicle owner’s name.
- In the dropdown menu under “Title Jurisdiction,” select the jurisdiction from the vehicle’s title. License Express will automatically select “Washington.”
- Enter the title number of the vehicle.
5. Under the “Vehicle” heading, enter the following information. License Express may auto-fill some of this information using the vehicle’s VIN.
- In the dropdown menu under “Vehicle Type,” select the vehicle type. Examples include “TK–Truck,” “TR–Tractor,” “BU–Bus,” and “DT–Dump Truck.”
- Under “Vehicle Make,” choose the “Search” button to select the make of the vehicle.
- Enter the vehicle’s model year.
- In the dropdown menu under “Fuel Type,” select the type of fuel the vehicle uses.
- Optional: In the dropdown menu under “Color,” select the vehicle’s color.
- Under “Unladen Weight,” enter the vehicle’s scale weight.
- Under “Gross Vehicle Weight,” enter the gross vehicle weight (GVW), which is the maximum weight (in lbs.) the vehicle can be when operating in Washington. This includes the truck, driver, trailer, and cargo.
- License Express will automatically calculate the Combined GVW based on the gross vehicle weight (GVW) you entered.
- Enter the vehicle’s number of axles.
- Optional: Under “Does the vehicle pull a trailer?” choose either the “Yes” or “No” option. Note: If you plan to choose “Combination” in step 13, you must choose the “Yes” option.
- Optional: Under “Does the vehicle transport hazardous material?” choose either the “Yes” or “No” option.
- Optional: Under “Does the vehicle transport milk?” choose either the “Yes” or “No” option.
- Optional: Under “Does the vehicle travel less than 10,000 miles?” choose either the “Yes” or “No” option.
- Choose the “Next” button.
6. Under “Is the vehicle under lease?” choose either the “Yes” or “No” option.
Note: Here, "lease" refers to carrier safety. This means we need information about who is responsible for the safety of this vehicle. This section is not about the lessee or lessor on the vehicle title.
7. Under the “Carrier Responsibility for Safety” heading, License Express will auto-fill “Operator Name,” “USDOT,” and “Federal ID” from your account.
8. Under “Was the vehicle purchased new by the current owner?” choose the “Yes” option if you purchased the vehicle new. Choose the “No” option if you purchased it used.
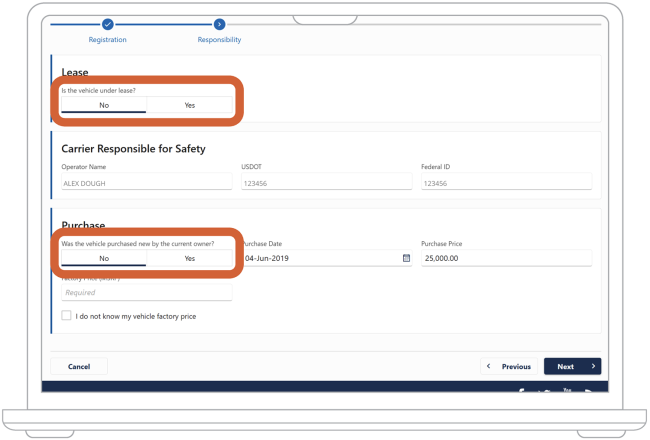
9. In most cases, License Express will auto-fill “Purchase Date” and “Purchase Price” using your vehicle’s VIN. If it doesn’t, find this information on your latest registration document and enter it manually.
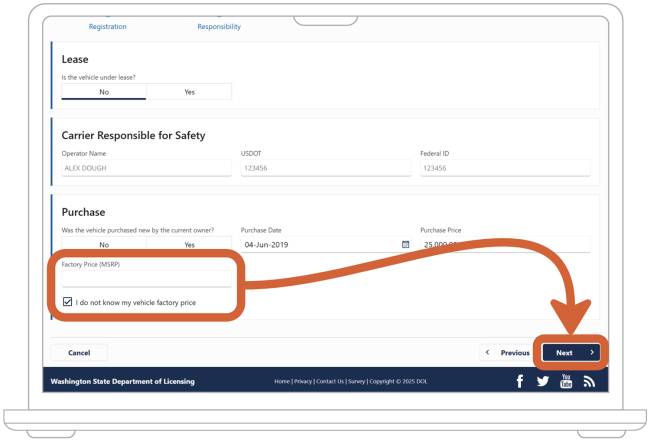
10. Enter the manufacturer's suggested retail price (MSRP) of your vehicle. If you don't know it, check the box next to “I do not know my vehicle factory price.” In some cases, License Express may auto-fill the MSRP.
11. Choose the “Next” button.
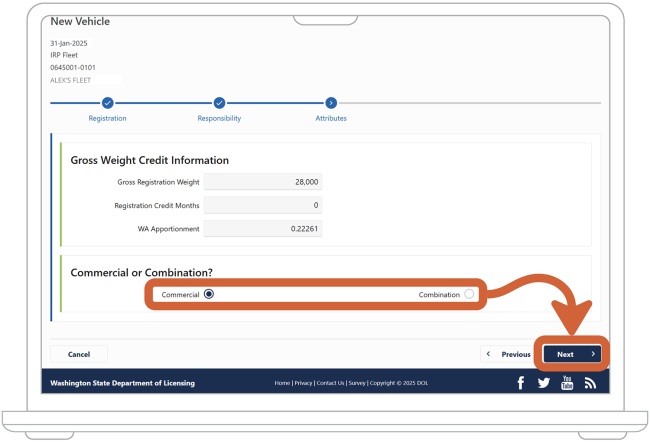
12. Under the “Gross Weight Credit Information” heading, License Express will calculate and auto-fill “Gross Registration Weight,” “Registration Credit Months,” and “WA Apportionment.”
13. Under the “Commercial or Combination?” heading, choose the “Commercial” option if your vehicle is a bus, dump truck, log truck, or box truck. Otherwise, choose the “Combination” option.
14. Choose the “Next” button.
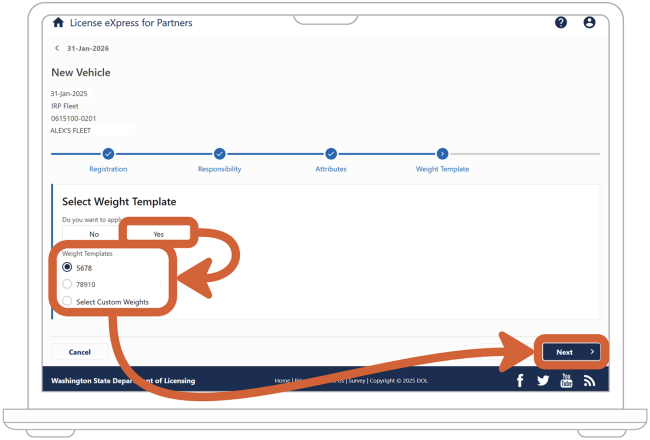
15. Indicate whether you want to use a weight template you already created:
- Choose the “No” button to set jurisdiction weights instead of using a weight template. Then choose the “Next” button and skip to step 16.
- Choose the “Yes” button to use a weight template you already created.
- Choose the weight template option you want to use for this vehicle. License Express will automatically select the “Select Custom Weights” option.
- Choose the “Next” button. Skip to step 17.
16. License Express will auto-fill the gross vehicle weight (GVW) for all the jurisdictions your vehicle will travel in. An exception is Quebec, which also asks for your vehicle’s total number of tires.
You can change these jurisdiction weights for your vehicle as follows:
- If you choose “Use Combine GVW/Axles,” License Express will auto-fill the gross vehicle weight (GVW) for all jurisdictions based on what you entered in step 5.
- If you choose “Use Max Weight,” License Express will auto-fill the maximum weight for all jurisdictions other than Washington. For Washington, License Express will auto-fill the information you entered in step 5.
Note: If a state has an unlimited maximum weight, you’ll need to enter the maximum weight manually for that jurisdiction.

17. Under “Save these weights for future use?” choose the “Yes” option if you want to save these weights and use them as a weight template in the future. Choose the “No” option if you don’t want to reuse these weights.
18. Choose the “Next” button.
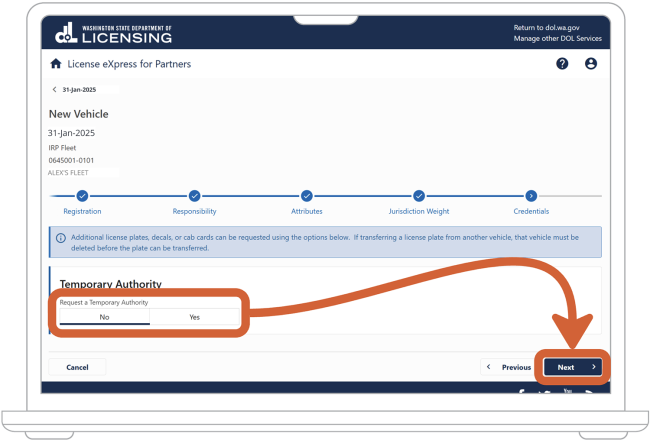
19. If you’re adding a vehicle to an existing fleet, you may request temporary authority. This is permission to operate the vehicle legally while you wait for us to process your registration and send your plates and cab card.
You can only request temporary authority for transactions related to new vehicles, not renewals. To qualify for temporary authority, your account must have been in good standing for at least 2 years.
We’ll review your request for temporary authority. If we approve it, you can print the document through License Express.
· If you don’t want to request a Temporary Authority, choose the “No” option. Then choose the “Next” button.
· If you want to request a Temporary Authority, choose the “Yes” option. Then choose the “Next” button.
20. Under the “Vehicle” heading, License Express will show some of the information you entered about the vehicle.
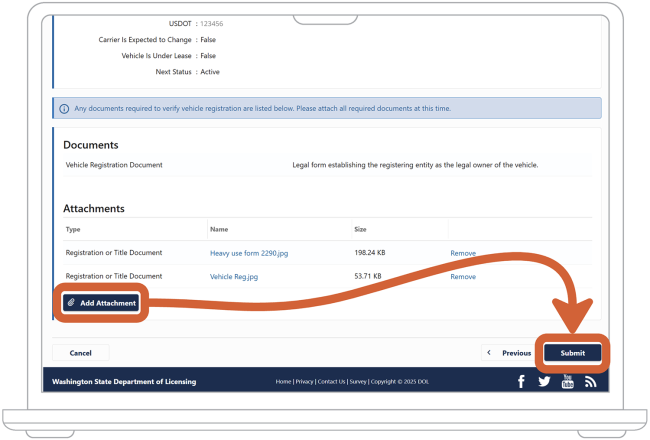
21. Under the “Documents” heading, review the documents we’ll need. These may include:
- Current stamped copy of the Federal Heavy Vehicle Use Tax form (2290)
- Washington vehicle registration (Validated Copy of Record)
- Signed cab card
- Lease agreement
- Gross weight certificate
22. Choose the “Add Attachment” button and select the file you want to upload. Then enter a name that describes the document. For example:
- For “Heavy Vehicle Use Tax (2290),” you can enter the name “Heavy use form 2290”
- For “Registration or Title document,” you can enter “Vehicle Reg.”
23. After you upload the documents we need, choose the “Submit” button.
24. In “Confirmation” popup, choose the “OK” button to submit the attachments.

If you want to change the files you attached or attach more files, choose the “Cancel” button. Then repeat steps 22 to 23.
25. Under the “Vehicles” heading, you'll see the vehicle you added to your account. The “Status” column will say “Pending” until we approve it.
After you add vehicles to your account
We’ll verify the information you provided. We may contact you with questions at any time while we work to verify your information. Watch your email inbox or your mailbox, depending on the method of communication you chose.
If we need changes, we’ll tell you why. You can try again once you have the correct information or documents.