
Before you get started
This guide is for new customers who have registered their License Express account but haven’t added an IFTA account to their License Express account.
If you previously used Taxpayer Access Point (TAP) to file IFTA returns and complete other transactions, read our guide on how to request access to an IFTA account in License Express.
You must set up a License Express account before you can add an IFTA account. You can learn:
Gather the required information
To set up an account, you’ll need the following information:
- Jurisdictions you plan to travel to
- Whether you maintain bulk fuel storage, and the jurisdictions where you store fuel
If you’re appointing a service agent
If you’re setting up an account for yourself and appointing a service agent, you’ll also need:
- The service agent’s Federal Employer Identification Number (FEIN) or Social Security number (SSN)—whichever they use when they pay their federal taxes.
- Your service agent’s contact information. · A signed and notarized power of attorney assignment form, which allows the service agent to manage your account.
If you’re a service agent setting up an account for someone else
If you’re setting up an IFTA account so you can do business on a taxpayer’s behalf, you’ll need a signed and notarized power of attorney assignment form from them. This allows you to manage their account.
Set up an IFTA account for yourself
If you’re a service agent, you can jump to instructions for setting up an IFTA account as a service agent.

1. In the dropdown menu under “Select account type to start registration,” select “IFTA.” Choose the “Next” button.
2. Read the “New Account Registration” instructions, then choose the “Next” button.
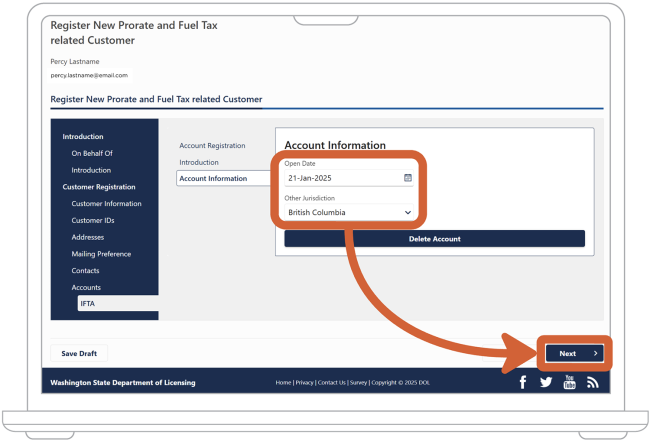
3. Under “Open Date,” enter or select the date you want your account to open.
4. In the dropdown menu under “Other Jurisdiction,” select 1 jurisdiction other than Washington that you plan to travel to. You don’t have to add every jurisdiction you’ll travel to at this time. Choose the “Next” button.
5. Indicate whether you maintain bulk fuel storage:
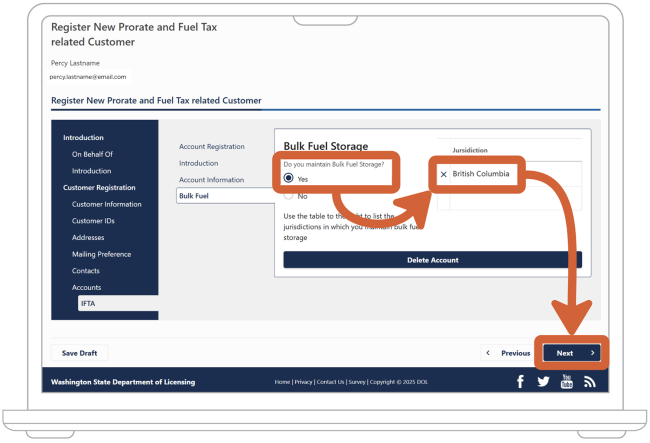
- If you maintain bulk fuel storage, choose the “Yes” option and then choose the jurisdiction(s) where you store fuel. Choose the “Next” button.
- If you don’t maintain bulk fuel storage, choose the “No” option and choose the “Next” button.
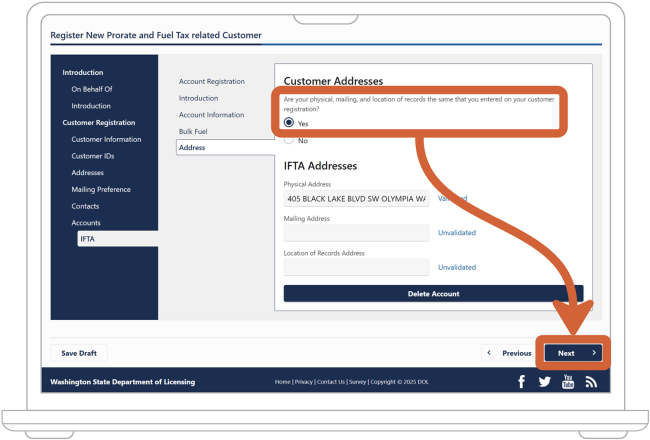
6. Reenter your address information. License Express will auto-fill the address(es) you entered when setting up your account.
Indicate whether your physical, mailing, and location of records addresses specific to IFTA are all the same. In most cases, this will match the information you entered while setting up your License Express account:
- If they’re the same, choose the “Yes” option and choose the “Next” button. Skip to step 7.
- If they’re different, choose the “No” option.
- If your mailing address differs from your physical address and License Express didn’t auto-fill the field, enter it under “Mailing Address.”
- If the address where you store your records differs from your physical address and License Express didn’t auto-fill the field, enter it under “Location of Records Address.”
- Choose the “Next” button.
7. Enter at least 1 contact for your business, government agency, or sole proprietorship. If you have a sole proprietorship, enter your own contact information:
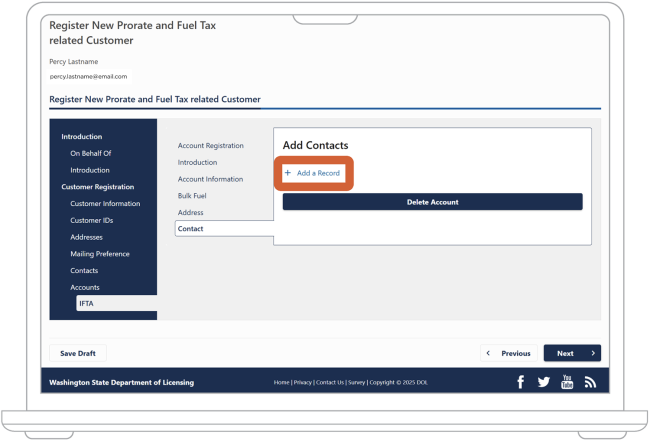
- Choose “Add a Record.”
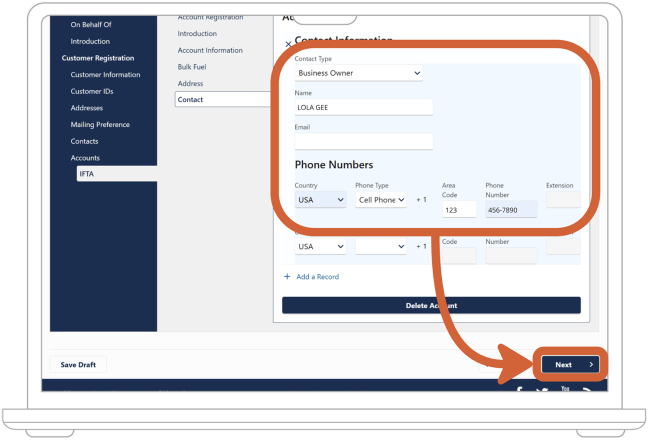
- In the dropdown menu under “Contact Type,” select who this contact is.
- Enter their first and last name.
- Optional: Add an email address for your contact.
- Enter at least 1 phone number for each contact. In the dropdown menu under “Country,” select the country for the contact’s phone number. License Express will automatically select “USA.”
- In the dropdown menu under “Phone Type,” select the contact’s phone number type.
- Enter the contact’s area code.
- Enter the contact’s phone number and extension (if applicable)
- If you want to add another contact, choose “Add a Record” and repeat steps 7.2 through 7.8.
- When you have entered all relevant contacts, choose the “Next” button.
8. Choose whether you want to appoint a service agent:
- If you want to appoint a service agent, choose the “Yes” option and choose the “Next” button.
- If you don’t want to appoint a service agent, choose the “No” option and choose the “Next” button. Skip to step 10.
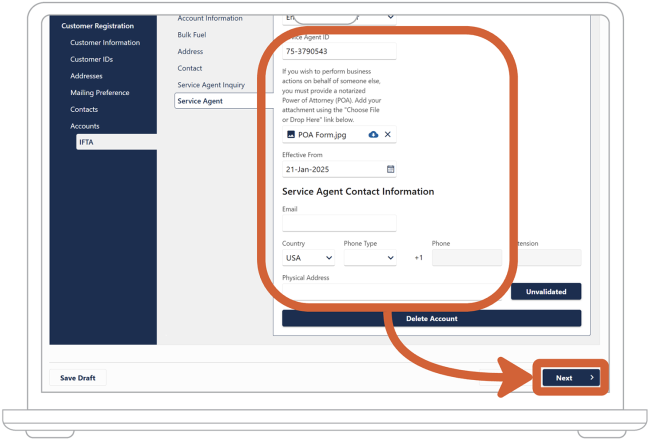
9. Enter your service agent’s information:
- In the dropdown menu under “Service Agent ID Type,” select the type of ID number this service agent has. It will be either their FEIN (or EIN) or their Social Security number (SSN). This will be the same number they use to file their federal income taxes.
- Enter their FEIN or SSN.
- Use the “Choose File” button to upload a signed and notarized Power of Attorney form. This allows your service agent to do business on your behalf.
- In the “Effective From” box, enter or select the date from which the Power of Attorney form is effective.
- Optional: Enter your service agent’s email address.
- Optional: In the dropdown menu under “Country,” select the country for your service agent’s phone number. License Express will automatically select “USA.” Note: This is required if you choose to enter a phone number for your service agent.
- Optional: Enter the service agent’s area code. Note: This is required if you choose to enter a phone number for your service agent.
- Optional: Enter the service agent’s phone number. Note: This is required if you choose to enter a phone number for your service agent.
- Optional: Enter the service agent’s extension.
- Optional: Enter the physical address for your service agent. License Express will automatically validate it for you. You don’t have to use the “Unvalidated” button.
- Choose the “Next” button.
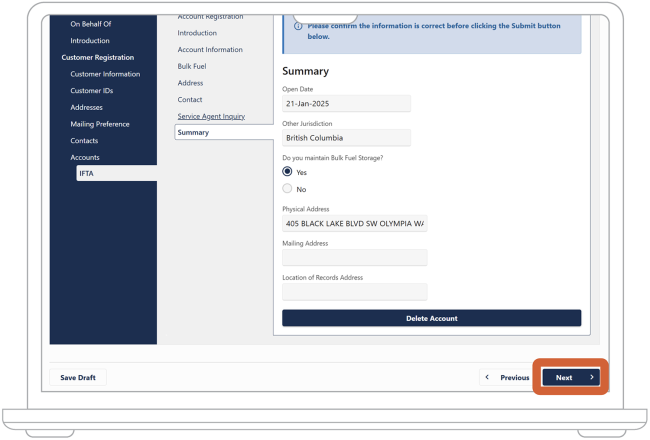
10. Check your information one more time. If you notice something incorrect, you can use the “Previous” button to make edits. Don’t use the “Back” button in your browser.
When all your information is correct, choose the “Next” button.
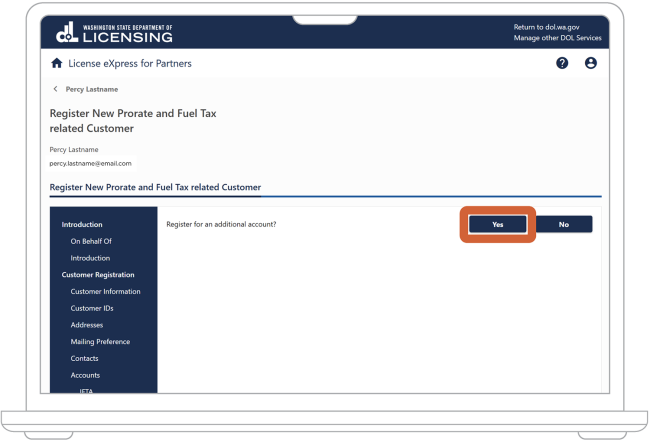
11. Choose whether you want to set up another Prorate and Fuel Tax (PRFT) account, such as an IRP or dyed diesel account:
- If you want to set up another account, choose the “Yes” button. You can find more guides on our [guide parent page link with title] page.
- If you’re finished setting up PRFT accounts, choose the “No” button.
Set up an IFTA account as a service agent
1. In the dropdown menu under “Select account type to start registration,” select “IFTA.” Choose the “Next” button.
2. Read the “New Account Registration” instructions, then choose the “Next” button.
3. Under “Open Date,” enter or select the date you want the taxpayer’s account to open.
4. In the dropdown under “Other Jurisdiction,” select or start entering the name of a jurisdiction other than Washington that the taxpayer plans to travel to. Choose the “Next” button.
5. Indicate whether the taxpayer maintains bulk fuel storage:
- If the taxpayer maintains bulk fuel storage, choose the “Yes” option and then select or start entering the name of the jurisdiction(s) where they store fuel. Choose the “Next” button.
- If the taxpayer doesn’t maintain bulk fuel storage, choose the “No” option and choose the “Next” button.
6. Reenter your address information. License Express will auto-fill the address(es) you entered when setting up your account:
- Indicate whether your physical, mailing, and location of records addresses specific to IFTA are all the same. In most cases, this will match the information you entered while you set up your License Express account.
- If they’re the same, choose the “Yes” option and choose the “Next” button. Skip to step 7.
- If they’re different, choose the “No” option.
- If your mailing address differs from your physical address and License Express didn’t auto-fill the field, enter it under “Mailing Address.”
- If the address where you store your records differs from your physical address and License Express didn’t auto-fill the field, enter it under “Location of Records Address.”
- Choose the “Next” button
7. License Express will auto-fill the contact information you entered while setting up your account:
- If you want to add another contact, choose “Add a Record” and follow steps 7.2 through 7.7.
If you don’t want to add another contact, choose the “Next” button and skip to step 8.
- In the dropdown menu under “Contact Type,” select who this contact is.
- Enter their first and last name.
- Optional: Add an email address for your contact.
- You must enter at least 1 phone number for each contact. In the dropdown menu under “Country,” select the country for the contact’s phone number. License Express will automatically select “USA.”
- In the dropdown menu under “Phone Type,” select the contact’s phone number type. Enter their phone number and extension (if applicable).
- When you have entered all relevant contacts, choose the “Next” button.
8. License Express will auto-fill your service agent information. Verify that it’s correct.
9. Use the “Choose File” button to upload the signed and notarized Power of Attorney form. This allows you to do business on the taxpayer’s behalf.
Choose the “open” button and then choose the “Next” button.
10. Check your information one more time. If you notice something incorrect, you can use the “Previous” button to make edits. Don’t use the “Back” button in your browser.
When all your information is correct, choose the “Next” button.

11. Choose whether you want to set up another Prorate and Fuel Tax (PRFT) account, such as an IRP or dyed diesel account:
- If you want to set up another account, choose the “Yes” button. You can find more guides on our [guide parent page link with title] page.
- If you’re finished setting up PRFT accounts, choose the “No” button.
After you set up your account
We’ll verify the information you provided. We may contact you with questions at any time while we work to verify your information. Watch your email inbox or your mailbox, depending on the method of communication you chose.
If we don’t approve your account, we’ll tell you why. You can try again once you have the correct information or documents.